
Late March or early April is a good time to start some of the more than twenty vegetables known as BRASSICAS.
Brassicas are also known as COLE CROPS.
Cole crops are also known as CRUCIFEROUS VEGETABLES!
Besides being high in fiber, brassicas are highly nutritious. Don't cook away the nutrients. Eat brassicas raw or barely cook them. It is best to steam, stir fry, roast, barbecue or saute.
Let's concentrate on the following six:
BROCCOLI
BRUSSELS SPROUTS
CABBAGE
CAULIFLOWER
COLLARD GREENS
KOHLRABI
All six of these vegetables evolved from the single species, Brassica oleracea.
The same seed starting procedure will be followed for all of the six brassicas listed above. Before we talk about the seed starting, let's visit a little bit about each of these six plants.
BROCCOLI
Here are some favorite varieties. Many are available from Territorial Seed Company:
ARCADIA
BELSTAR
DECICCO EXPRESS
EMERALD CROWN
EVEREST
EXPRESS
FIESTA
GREEN SPROUTING CALABRESE
PACKMAN
SOUTHERN COMET
WALTHAM
Although most people focus on eating the flower buds, the stems and leaves of broccoli plants are edible, too. Peel away the outsides of thick stems and enjoy the tender interior whether raw or cooked.
We often find that the large central flower heads of our broccoli plants are ready for harvest by the end of July. Sometimes earlier.

A remarkable trait of broccoli is the plant's ability to produce lots of florets after the large central head has been harvested. The side florets start out quite large. The side florets continuously decrease in size as you harvest throughout the summer and into fall.

Even if you are growing several different varieties of broccoli, you might find an overwhelming amount ready to harvest all at the same time!

When we have an abundance of broccoli ready for harvest, its fun to share with friends and neighbors. Another option is dehydration. Broccoli dehydrates nicely. It also freezes well. Whether dehydrating or freezing broccoli, a brief soak first of a minute or two in boiling water is necessary. This process is called blanching.


BRUSSELS SPROUTS
When I was a kid, my least favorite vegetable was brussels sprouts. Even though my taste buds have matured and I grow my own vegetables, I think it is the recipe that makes all the difference for me when it comes to brussels sprouts. Take the time to ask and hunt around for popular brussels sprouts recipes. Try a few recipes. You just might add this vegetable to your favorites list. I did!

CATSKILL
DIABLO
LONG ISLAND
ROODNERF
RUBINE
The brussels sprout plant is happiest in cool weather with lots of rain or watering. This is also true of the other brassicas listed above. However, brussels sprouts are comparatively slow growing early in the season. The sprouts look like tiny cabbages growing first from the bottom and then gradually on up to the top of the tall stalk. There is a sprout with every leaf!
The flavor seems to be at its best if you wait until after the first fall frost to harvest. Harvest the lowest of the sprouts when the size is to your liking and work your way up. It helps to remove the lower leaves on the mature plants. This seems to result in more energy going into sprout growth.
Brussels sprouts will survive with no problem throughout winter. They are very cold tolerant. We really look forward to large harvests for Thanksgiving and the winter holidays. When the sprouts have all been eaten, the little bundles of greens at the top of the plants are edible and delicious!
Favorite method of cooking brussels sprouts? ROASTED!
- Preheat oven to 350 degrees.
- Pick a bunch of brussels sprouts... two dozen or so.
- Rinse.
- Remove any bad outer leaves.
- Slice sprouts in half.
- In a bowl, toss the brussels sprouts in 3 tablespoons of olive oil or some other vegetable oil.
- Spread the brussels sprouts in a baking dish.
- Sprinkle generously with garlic powder, salt and pepper.
- If you like, sprinkle on some red pepper flakes.
- Flip the sprouts with a spatula after 10 minutes.
- Roast another 5 or 10 minutes until nicely browned.
CABBAGE

Looking at the research, it is worth your while to grow each type and color of cabbage. They are all highly nutritious, but each type has its own superiority in the area of nutrients. There is the standard green, also referred to as white, in the photograph above.
Another type is savoy cabbage:

A third type of cabbage is red, also known as purple:

We have grown many varieties of each of the three types of cabbage and have enjoyed them all.

The cabbages will be ready for harvest as early as July depending on the weather and the variety you choose. We usually enjoy eating a cabbage every week or two throughout the summer and fall. Cole slaw is a favorite. Try it with a variety of dressings. And, it is fun project changing cabbage into sauerkraut!


Cabbage handle the cold weather well enough to leave them in the ground well into winter, if there are any left! It helps to mound mulch around them. Cabbage store well in a root cellar type environment, too.
Given the right conditions, cabbage have been known to grow to an unimaginable size!

Varieties we have enjoyed:
ALCOSA
BOBCAT (slugs are not attracted to this one in our gardens)
CLARISSA
COPENHAGEN MARKET EARLY
DANISH BALLHEAD
DEADON
DERBY DAY
EARLIANA
EARLY JERSEY
EARLY JERSEY WAKEFIELD
FAMOSA
FERRY'S ROUND DUTCH
GOLDEN ACRE
JANUARY KING
MATSUSHIMA
RED ACRE
RUBY BALL
TIARA
CAULIFLOWER
 |
| EARLY SNOWBALL VARIETY |
 |
| AMAZING VARIETY |
Look at the colorful varieties available now! And do cauliflower do well in Sitka? Oh, my! YES!
 |
| GRAFFITI VARIETY |
 |
| AMAZING, CHEDDAR AND GRAFFITI |
What to do with these beauties? Eat it raw in salads or with dips. Steam it, roast it, stir fry or coat cauliflower florets with tempura for a quick deep fry.
A fairly recent favorite for my family is to turn cauliflower into what looks like mashed potato. Steam it briefly and whip it in a mixer. Add your favorite condiments or seasonings. Be creative! There is no end to the flavors mashed cauliflower will accept.
Another surprisingly delicious and simple cauliflower preparation is dehydration. Unlike broccoli, no need to blanch cauliflower first. Simply cut into small florets or pieces. Fill your dehydrator. (We usually dry our veggies completely at about 115 to 120 degrees). Dehydrated cauliflower is crunchy with a nutty flavor. Eat these little gems as a delicious snack. Add them as a final, crunchy topping on salads.
Store in a cool dry location and your dried cauliflower will maintain its nutrients and crunchiness for a very long time. What a great way to preserve this beautiful brassica!

Varieties we have enjoyed:
AMAZING- white
CANDID CHARM - white
CASSIUS - white
CHEDDAR - orange
FLAME STAR - orange
GRAFFITI - purple
PURPLE OF SICILY - purple changes to green when cooked
SNOW CROWN - white
SNOWBALL - white
COLLARD GREENS
A few years ago, a visitor to our gardens professed his love for collard greens. I had never grown them or eaten collard greens even though I had lived in the deep south of Mississippi for a few of my teenage years. These were years before I had any interest at all in eating vegetables!
So, I made it a point to grow some collard greens for this man the next year. Even though he moved away before they were ready for harvest, I was still glad I grew them. They are delicious! Collard greens have a mild, cabbage like flavor. Of course, like many brassicas, it has a lot to do with the recipe and preparation. I have not done much experimenting with collard greens, but already love them sautéed with onions and garlic. It helps to crumble up something like almonds or cooked bacon and sprinkle it on top!
 |
| VARIETIES WE HAVE GROWN |
One of my first collard plants!

KOHLRABI

For many years, I would sow kohlrabi seeds directly into a garden bed in May. Because I have grown to cherish this brassica, I don't leave growth to chance. It seems wiser to start my kohlrabi seeds in 4" pots when starting the previous five brassicas. This way the number and placement of plants is defined.
The kohlrabi has an interesting design. The root grows in the ground. The large bulb we love to eat grows just above ground. Leaves grow out from, and all around, the bulb!

Based on research, both green and purple kohlrabis are nutrient-rich. The purple kohlrabi might be just a little more nutritious... as with other deeply colored brassicas.
Once the kohlrabi bulb is sizable, cut away the leaves and root. Peel the bulb. Kohlrabi can be cooked many ways, but we prefer to eat our kohlrabi raw. Cut raw kohlrabi into small pieces or slices for a quick snack. Grate kohlrabi into salads. Eat raw chunks with your favorite dips.
Kohlrabi varieties we have grown and enjoyed:
EARLY WHITE VIENNA
KONGO
PURPLE VIENNA
SUPERSCHMELZ
NOW FOR A QUICK LOOK AT STARTING THESE BRASSICAS FROM SEED:
FIRST FILL 4 INCH POTS WITH POTTING SOIL.
PLACE THE FILLED POTS IN SOME SORT OF TRAY OR CONTAINER. WE FILL OUR POTS AND CONTAINERS OUTSIDE SO WE DON'T MAKE A MESS INDOORS. THEN WE CARRY THE FILLED CONTAINERS INDOORS.

MAKE TWO DIMPLES IN THE SURFACE OF THE SOIL NO DEEPER THAN 1/2 INCH.

PLACE ONE SEED IN EACH DIMPLE.
LABEL EACH 4 INCH POT.
COVER OVER THE SEEDS AND THE ENTIRE SURFACE OF EACH POT WITH A THIN LAYER OF FINE SAND OR POTTING SOIL. PLACE THE CONTAINERS IN YOUR WARMEST LOCATION OR ON A SEED STARTING HEAT MAT.
GENTLY AND THOROUGHLY MOISTEN EACH OF THE 4 INCH POTS WITH ROOM TEMPERATURE WATER. WE HAVE A HOSE WE ATTACH TO A MUD ROOM FAUCET THAT REACHES THE ROOM AND WINDOWS WHERE OUR CONTAINERS ARE LOCATED.
LOOSELY COVER THE ENTIRE CONTAINER FULL OF 4 INCH POTS WITH PLASTIC.

REMOVE THE COVER PERIODICALLY TO WATER. KEEP THE SURFACE MOIST.
IT WILL USUALLY TAKE ANYWHERE FROM ONE TO TWO WEEKS FOR BRASSICA SEEDS TO SPROUT.
ONCE THE SEEDS HAVE SPROUTED UP THROUGH THE SURFACE OF THE POTTING SOIL, REMOVE THE PLASTIC COVER PERMANENTLY.
HOPEFULLY BOTH SEEDS IN EACH POT WILL SPROUT INTO A PLANT. EVEN ONE PLANT PER POT IS FINE. THESE BRASSICA PLANTS WILL BE STAYING IN THESE 4 INCH POTS INDOORS IN A WARM LOCATION WITH THE BEST LIGHT YOU CAN OFFER UNTIL THEY GROW QUITE LARGE. FOUR TO SIX WEEKS IS GOOD.
WITH THE PLANTS IN THE SAME POTS, FERTILIZE THEM LIGHTLY AND TRANSPORT THEM OUT TO A COLD FRAME OR GREENHOUSE WHERE THEY WILL STAY FOR A WEEK OR TWO. THIS IS CALLED HARDENING OFF. THE PLANTS GET ACCUSTOMED TO THE COOLER NIGHT TIME.
BY THE END OF MAY, YOUR BRASSICA PLANTS SHOULD BE PLANTED OUTSIDE. A RAISED FERTILE BED NEEDS TO BE PREPARED IN ADVANCE.
SEPARATE EACH OF THE PLANTS BY GENTLY EMPTYING EACH OF THE 4 INCH POTS AND CAREFULLY SEPARATING THE TWO PLANTS FROM EACH OTHER.
DIG A GOOD SIZED HOLE BY HAND OR WITH A TROWEL FOR EACH PLANT.
PLACE THE PLANT IN THE HOLE AND FILL WITH SOIL AROUND THE ROOTS. THE SOIL SHOULD COME UP AROUND THE STEMS TO THE HEIGHT OF THE FIRST LEAVES. HIGHER IF THE PLANT IS LEGGY. IT WON'T HURT THE PLANT.
PRESS THE SOIL FIRMLY AROUND THE PLANT. NOT TOO FIRM!
NOW MAKE A SOMEWHAT WIDE WELL AROUND THE PLANT SO THE PLANT LOOKS LIKE IT IS IN A BOWL.
FILL THE BOWL GENTLY EACH TIME YOU WATER, WHICH SHOULD BE OFTEN, AT LEAST ONCE PER WEEK, IF IT IS NOT RAINING HEAVILY.


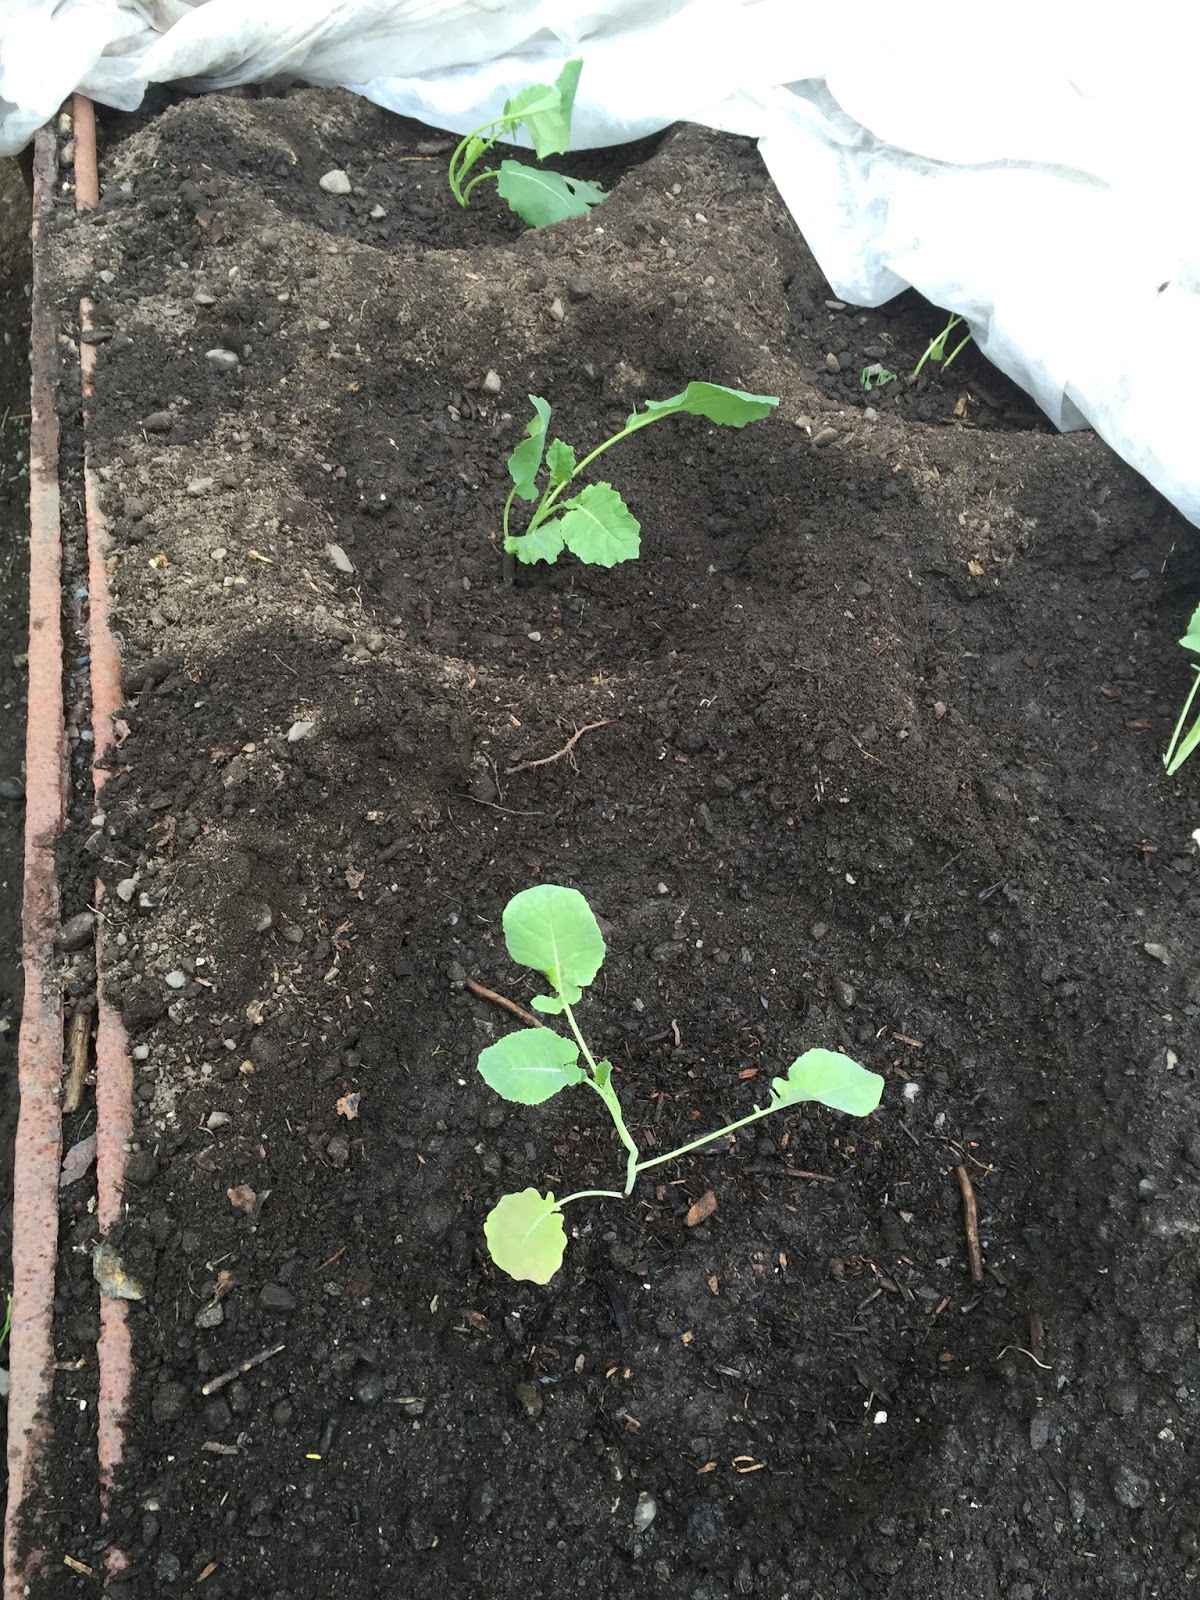
COVER THE ENTIRE PATCH OF BRASSICAS VERY LOOSELY WITH A FLOATING ROW COVER. LEAVE PLENTY OF SLACK. HOLD THE EDGES OF THE COVERS DOWN WITH WHATEVER HEAVY ITEMS YOU HAVE HANDY. WE USE ROCKS AND OLD REBAR.

YOU WILL NOT NEED TO REMOVE THE FLOATING ROW COVER TO WATER. YOU WILL NEED TO REMOVE THE FLOATING ROW COVER FOR WEEDING. WHEN YOU HAVE FINISHED WEEDING, COVER THE PLANTS AGAIN.
SADLY, YOU WILL ALSO NEED TO REMOVE THE COVER TO DEAL WITH SLUGS. SLUGS GO CRAZY OVER BRASSICAS!

Thank you so much for this info-rich article! I stumbled upon your blog while googling the differences between a flat and round cabbage as I've always been curious, but stuck to the standard round kind as my mum told me to stay away from the flat ones - she doesn't think they're very tasty. But I'm more adventurous than that so...!
ReplyDeleteAnyway, please keep up the great work! Lovely garden by the way!