TOMATOES are reluctant to ripen in Sitka without some help. It's just not warm enough most summers even for the very early varieties. After years of experimenting, the greenhouse wins out. There should be a sign over our greenhouse door, "Give me your cold and weary."
There are quite a few early tomato varieties that do well in a protected environment. We have enjoyed many varieties including GLACIER, SILETZ, STUPICE, NORTHERN DELIGHT, SUB-ARCTIC, BEAVER LODGE, OREGON SPRING, LEGEND, SUNGOLD, YELLOW PERFECTION and EARLY GIRL.
Here are my three favorites. They are delicious and have produced well consistently:
Here are my three favorites. They are delicious and have produced well consistently:
 |
| LEGEND |
 |
| SUNGOLD (children love these) |
In each of the 4" pots use your finger and make two or more depressions about 1/2 inch deep.
Drop a seed into each of the depressions. Now sprinkle enough sand on the surface of each 4" pot to cover the entire surface... about 1/2" of sand. If you don't have sand, use potting soil. Label each 4" pot if you are growing more than one kind of plant or more than one variety. The pots always get mixed up if you don't label them. Trust me. (The seed packets you see below are there just temporarily for show).
Gently water the surface of each 4" pot with warm water until well moistened. Fill the base of the tray with about 1/2" of warm water as well. Cover over the entire tray loosely with a plastic bag ripped open. Air needs to circulate under it or you will see it get moldy in there. Recycled plastic bags from the grocery store work well. Place the tray on the hearth behind your wood stove (if you have one), use an electric seed warming mat or set it near your furnace or home heater. Take advantage of whatever warm spot you have in your home.
In general, seeds germinate in a matter of days. Some take weeks. Most tomato seeds take one or two weeks. Be patient and keep them plenty moist (not real wet) and warm.
Ten days later and... voila! There are two or more lovely little tomato plants growing in each of the 4" pots:
Twenty five more days have passed. The tomato plants have outgrown their 4" pots. Time to do some transplanting.
Water the plants. Carefully shake out the contents of each 4" pot. Gently separate the tomato plants taking care not to damage the plants or roots. At this stage, the tomato plants often look a little leggy... thin and tall.
Each individual plant now needs a new home in a gallon-sized container. If you don't have any, get creative. Try using something like gallon-sized plastic milk cartons from the recycle center, cut off the tops and poke holes in the bottom.
Put a little soil in the bottom of your container. Now set the tomato plant deep in the bottom center of the container. Holding the plant steady with one hand, fill the soil around the stem all the way to the top of the container. Burying the stem up past the lower leaves is fine. Roots will grow all the way up the buried stem. Tamp the soil down a little. Label. When you have given each tomato plant a new home, water gently and thoroughly. Set all of the plants in a tray and place the tray in your sunniest location indoors. Water regularly to moisten, but do not overwater.
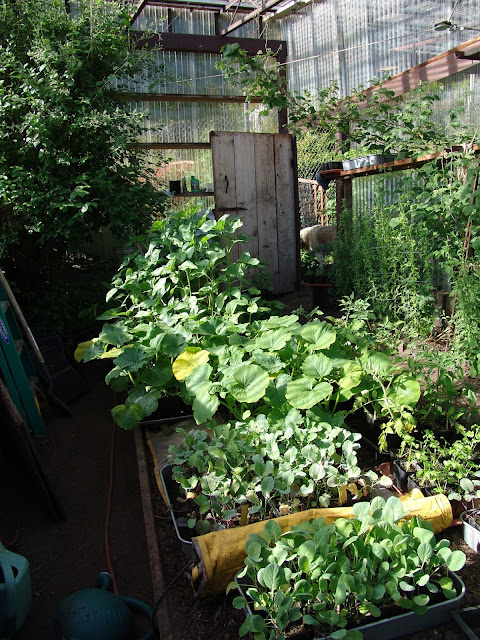
After three or four weeks in the larger pots, the tomato plants are ready to go out into a greenhouse or cold frame type environment. Our tomato plants, still in their gallon sized pots, were moved into our greenhouse with lots of company. There they are in the center to the right of the zucchini plants.
After a week or two of getting accustomed to the cooler nights, the tomato plants are removed from their gallon pots and planted into large containers in the greenhouse
or removed from gallon pots and planted directly into the soil floor of our greenhouse.
Because I often start quite a few tomato plants, there are usually enough for me to also place a few in our sunniest window inside our home. These also have been taken out of the gallon pots and transplanted into much larger containers.
Tomato plants need to be watered and fertilized regularly throughout the season... taking care not to overwater. It is surprising how many tomatoes each plant produces! We often have more tomatoes ripe at the same time than we can eat. Simply keep a ziplock in your freezer and pop any extra ripe tomatoes inside. You will likely end up with a large collection of whole, frozen tomatoes that can later be cooked into sauces, soups, chili, salsa and more!
At the end of the tomato season, usually the end of September for us, pick all of the green tomatoes off of your plants, place them on a tray and put the tray in a dark pantry or cabinet inside your house. Don't forget about them! Check them regularly. It won't be long before the tomatoes are ripe and brightly colored!


No comments:
Post a Comment