
Although not always in great abundance, wild mushrooms grow in Sitka's temperate rainforest.
Some years are better than others. Warm temperatures and the amount of precipitation have a lot to do with it.
Some Sitkans spend a ridiculous amount of time hunting for mushrooms in the surrounding woods. I know this to be true from personal experience.
Some mushroom hunters are simply more skilled at locating mushrooms than others. Some are just plain lucky...

Of course, it really helps to know what to look for and where to look. Most importantly, we need to know which mushrooms are safe and palatable.
In order to know these things, I highly recommend learning from a pro. Maybe do what I did. Sign up and attend the class at UAS Sitka named SOUTHEAST MUSHROOM IDENTIFICATION. It has been taught regularly throughout the years by brilliant, vivacious Kitty LaBounty. After time well spent in the classroom and out in the forest, participants become well equipped with knowledge, enthusiasm and confidence. It was years ago that I was one of Kitty's students. My field partner was the late Mark Moats (coincidentally the brother of a favorite student of mine, Elida Davis Horn). I will never forget Mark. His energy and sense of humor kept our hunts dynamic and hilarious!
No time for a class? Maybe you could tag along with an experienced mushroom hunter. Also, there are excellent mushroom guidebooks loaded with information and illustrations. One of the books below, MUSHROOMS DEMYSTIFIED, has 959 pages!

GOOD
HEDGEHOG
Hydnum repandum/Dentinum repandum


The fact that it is usually shady in the woods makes it all the easier to spot HEDGEHOGS. They glow a little bit in shades of whitish beige to light orange. HEDGEHOGS are medium sized... meaning the cap is from one to three inches in diameter on average. Some are smaller. Some are larger.
Stems are often a little bit lighter in color than the caps.

The underside of the cap is covered with little spikes, sometimes referred to as teeth or spines. These little spikes break off easily when brushed against something.
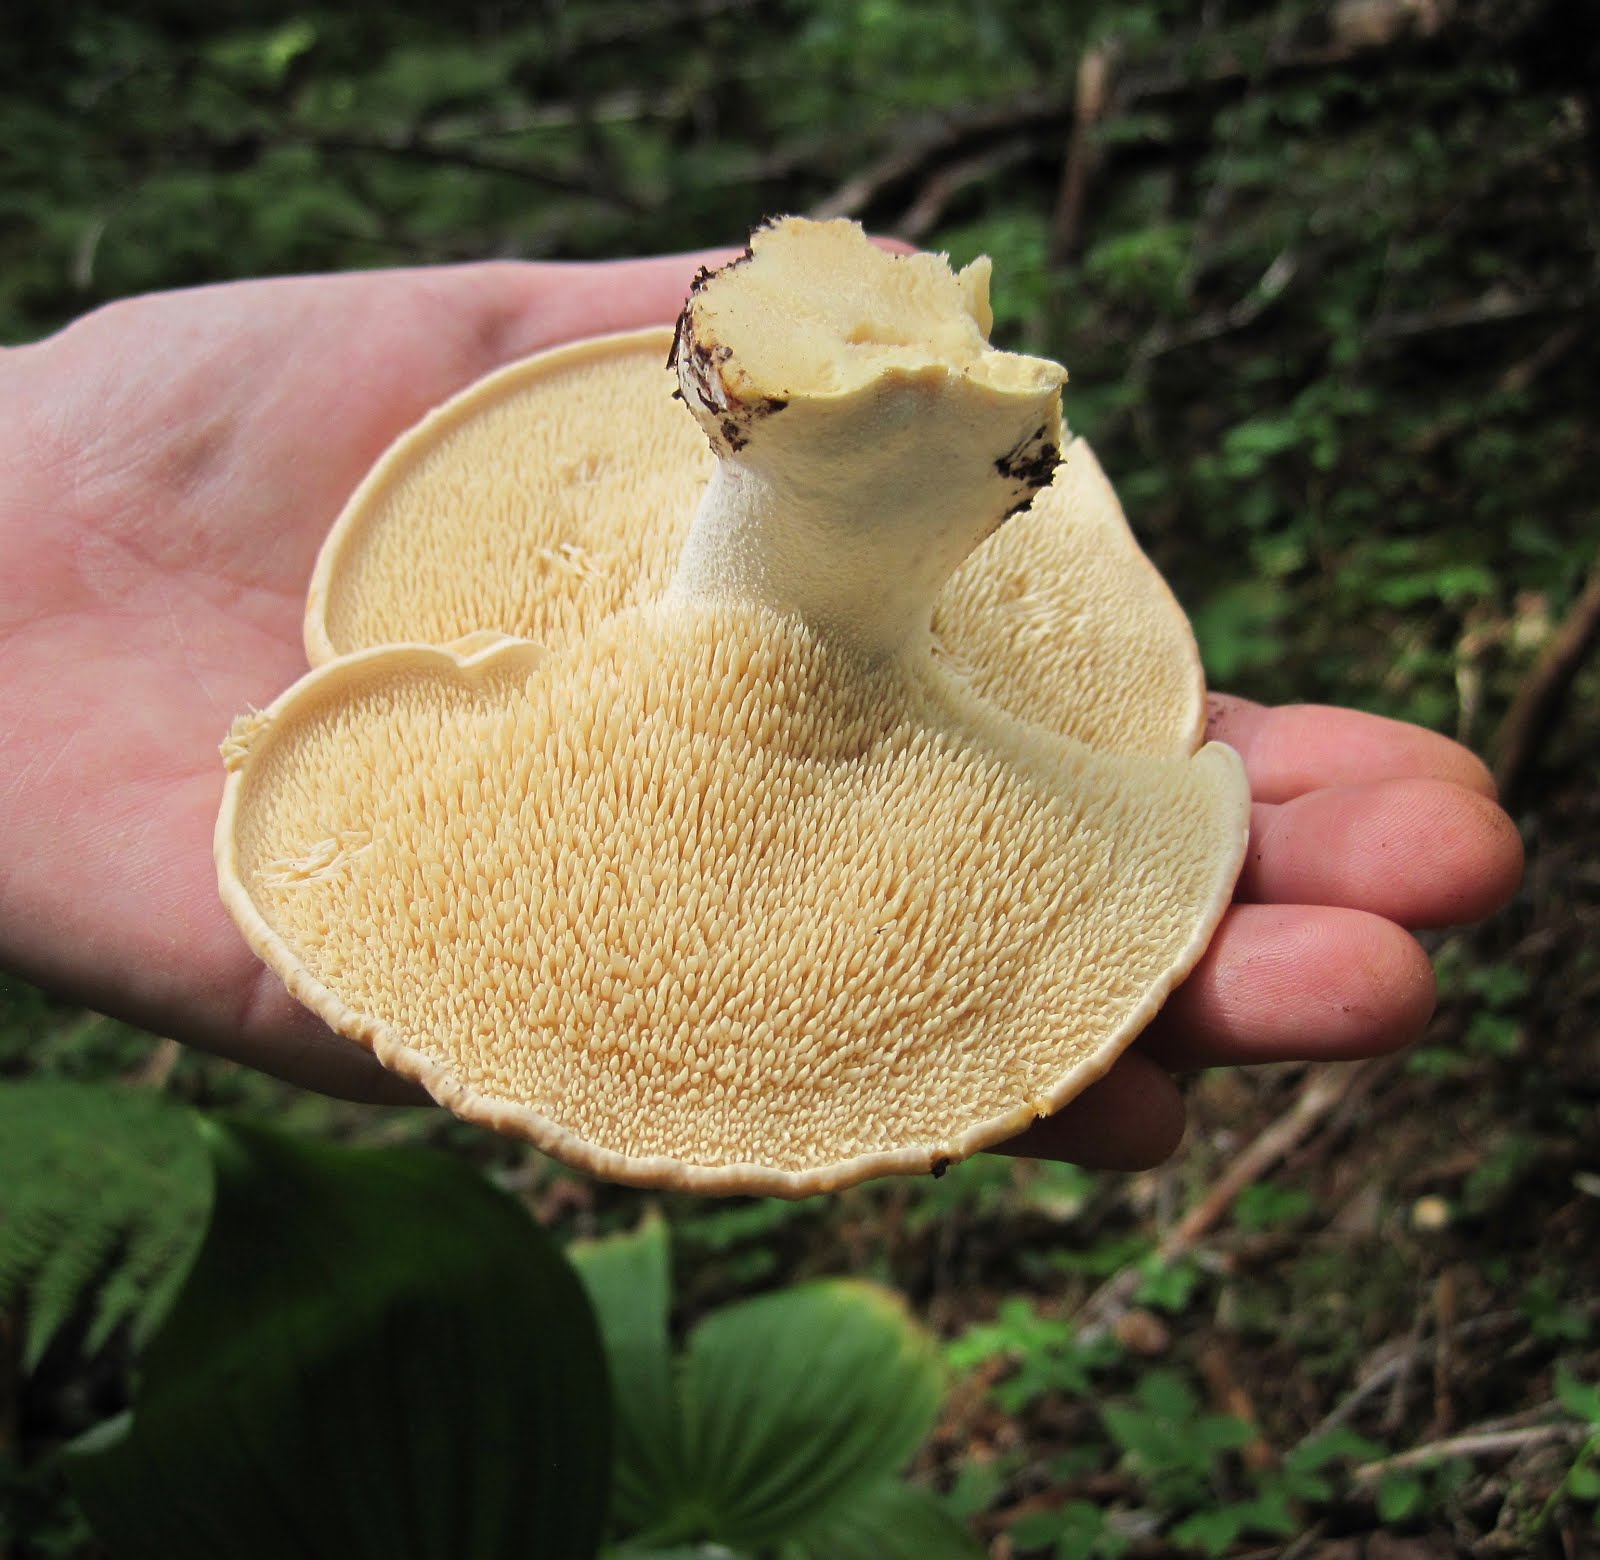
The surface of the cap is smooth for the most part, but can look a little scaly and cracked as they age.

HEDGEHOGS grow on the damp floor of forests and are frequently found under conifers including spruce.
HEDGEHOGS are not uniform in size and shape.
When a HEDGEHOG is broken into pieces, it is somewhat like breaking chalk. The fleshy interior is light colored and is not at all woody. The stalks are also like chalk. They are firm and vary in width.
HEDGEHOGS are popular not only because they are comparatively plentiful, but also because they are tasty. A little bit spicy.
- Here is how I often prepare HEDGEHOGS:
- First you need to clean off any dirt, bugs and needles.
- Trim off any bad spots and bruises.
- Some people scrape off the spikes on the underside of the caps. I don't.
- Break up or slice the mushrooms into good sized pieces.
- Now dry saute. This is simply a method of eliminating the water from mushrooms with a high water content. Place the mushrooms into a fry pan. No butter or oil. Just sprinkle a little salt on them. Cook the mushrooms in the pan on medium high heat for awhile, stirring constantly. Liquid will come out of the mushrooms. Continue to stir while the mushrooms continue to cook in this liquid... until all of the liquid is gone. Once you have cooked out the water, lower the heat to medium and, if you like, add your favorite herbs and spices. Saute or stir fry the mushrooms in a little olive oil, butter or bacon fat. They should be browned and lovely in 5 to 10 minutes.
Cook and eat HEDGEHOGS as a snack or include them in a meal.
BETTER
GOLDEN CHANTERELLE
Cantharellus formosus/Cantharellus cibarius

Gold on the forest floor!
GOLDEN CHANTERELLES are a favorite of many mushroom hunters. Not only are they beautiful, but they are delicious!
The cap of the GOLDEN CHANTERELLE, as seen in the above photo, is a bright yellow/orange in color. These mushrooms grow up out of the ground. As they mature, the top of the caps often become somewhat concave and are often described as vase shaped. Size varies from small to large.
The underside of the cap has unique gills that look like ridges. The color is the same as the cap or slightly lighter. These ridges are shallow, vein-like and run part way down the solid stem.

Slice open a GOLDEN CHANTERELLE and see a lighter shade of flesh.

When you find GOLDEN CHANTERELLES, they might be dirty.
In fact, they often are.

Wipe off the dirt and needles, if possible. If the mushrooms need to be washed off, they will end up quite wet. That's okay. You will be doing a dry saute same as described above when cooking HEDGEHOGS.
Once the dry saute is complete, add a little butter or oil and brown the chanterelles at medium heat. Use the mushrooms in any dish you like. They are so flavorful!
One of my favorite recipes for GOLDEN CHANTERELLES is a simple version of
CREAM OF CHANTERELLE SOUP:
INGREDIENTS
about 1 lb of CHANTERELLES cleaned, sliced and dry sautéed & browned
2 medium sized onions chopped
4 tablespoons of butter
4 tablespoons of flour
1 quart of chicken or vegetable broth
1 cup of whole milk or 1/2 and 1/2
1 teaspoon of salt
1/2 teaspoon of pepper
optional: chopped chives as topping
DIRECTIONS
BEST
KING BOLETE
Boletus edulis
The sun was shining and the seas were totally calm both of the days my friend and I were crabbing up in Hoonah Sound. Unexpectedly, with very little warning, gale force east winds and heavy rains were predicted to come screaming down Peril Strait the afternoon of our third day. False Island was nearby. We hastily ran our boat in and tied up at the dock. The original plan for day three was to cook and clean a bunch of crab we caught, spend the night and head on home. As it turned out, we would be weathered in at False Island for several more days. What better place to get weathered in when we were in the midst of an early mushroom hunting season?!?!?
The next day, clothed in heavy rain gear, we hiked along the beautiful beaches picking beach asparagus and beachcombing. It was pouring rain. Gradually, we left the windy shoreline and headed into the beckoning woods. We were anxious to explore some old growth forest. The towering trees above the streams and ocean just might be sheltering fresh mushrooms all aglow on the damp forest floor.
It was not long before my friend and I wandered away from each other while searching for mushrooms. We made noise and called to each other periodically remaining in earshot. All of a sudden, I heard a piercing scream from my friend. I immediately thought that she had run into a bear! I dropped everything. Grabbing my gun in one hand and my can of bear spray in the other, I ran in the direction of my friend's scream. She was not far away. To my astonishment, there she stood with a huge smile on her face and a big mushroom in her hands!
A magnificent KING BOLETE!!!
We found several more KING BOLETES nearby.
We hiked on back to the boat and fired up the stove for dinner.
This is a look at a KING BOLETE sliced open:

The KING BOLETES were quickly cleaned.

All were sliced and dry sautéed.

We browned the KING BOLETES in butter and devoured them with dinner. The flavor was mild and nutty. SOOOO GOOD!
I am not sure if KING BOLETES are extraordinarily delicious... or I just think that they are because they are so darn difficult for me to find!!!
Not only are they a rare find, but they are rarely in good shape when found. Here is a very young KING BOLETE growing up from the ground in great shape:

Unfortunately, there are some worm-like bugs that have radar or a super nose for KING BOLETES. I left the mushroom (seen in the photo above) in the ground overnight hoping it would increase in size. It was in the woods not far from home. When I returned the next day, it was riddled with bugs. Best not to walk away from a healthy KING BOLETE!!! Harvest it there and then!
Another heartbreaking feature about KING BOLETES is their rush to old age. Just suppose one of these mushrooms is not attacked by bugs and worms. In a surprisingly short period of time, a lovely, firm KING BOLETE like the one seen above transforms into this:
 I know. Hard to believe. The size increases like crazy. The underside of the cap becomes a wobbly, marshmallow-like sponge. The gorgeous, thick stalk becomes stringy and tough. It is totally unpalatable when it grows into this fairy tale form.
Cantharellus formosus/Cantharellus cibarius

Gold on the forest floor!
GOLDEN CHANTERELLES are a favorite of many mushroom hunters. Not only are they beautiful, but they are delicious!
The cap of the GOLDEN CHANTERELLE, as seen in the above photo, is a bright yellow/orange in color. These mushrooms grow up out of the ground. As they mature, the top of the caps often become somewhat concave and are often described as vase shaped. Size varies from small to large.
The underside of the cap has unique gills that look like ridges. The color is the same as the cap or slightly lighter. These ridges are shallow, vein-like and run part way down the solid stem.

Slice open a GOLDEN CHANTERELLE and see a lighter shade of flesh.

When you find GOLDEN CHANTERELLES, they might be dirty.
In fact, they often are.

Wipe off the dirt and needles, if possible. If the mushrooms need to be washed off, they will end up quite wet. That's okay. You will be doing a dry saute same as described above when cooking HEDGEHOGS.
Once the dry saute is complete, add a little butter or oil and brown the chanterelles at medium heat. Use the mushrooms in any dish you like. They are so flavorful!
One of my favorite recipes for GOLDEN CHANTERELLES is a simple version of
CREAM OF CHANTERELLE SOUP:
INGREDIENTS
about 1 lb of CHANTERELLES cleaned, sliced and dry sautéed & browned
2 medium sized onions chopped
4 tablespoons of butter
4 tablespoons of flour
1 quart of chicken or vegetable broth
1 cup of whole milk or 1/2 and 1/2
1 teaspoon of salt
1/2 teaspoon of pepper
optional: chopped chives as topping
DIRECTIONS
- Melt the butter in a saucepan and cooked the chopped onions in the butter at medium heat until they are browned.
- Sprinkle the flour over the browned onions and stir well.
- Continue with medium heat and gradually stir in the quart of broth. It should thicken nicely.
- Stir in the mushrooms, salt, pepper and milk. Heat on low until it is all plenty hot. But, don't let it boil because the milk will curdle.
- Ladle into bowls.
- Sprinkle a few chopped chives on top.
- Enjoy!
BEST
KING BOLETE
Boletus edulis
The sun was shining and the seas were totally calm both of the days my friend and I were crabbing up in Hoonah Sound. Unexpectedly, with very little warning, gale force east winds and heavy rains were predicted to come screaming down Peril Strait the afternoon of our third day. False Island was nearby. We hastily ran our boat in and tied up at the dock. The original plan for day three was to cook and clean a bunch of crab we caught, spend the night and head on home. As it turned out, we would be weathered in at False Island for several more days. What better place to get weathered in when we were in the midst of an early mushroom hunting season?!?!?
The next day, clothed in heavy rain gear, we hiked along the beautiful beaches picking beach asparagus and beachcombing. It was pouring rain. Gradually, we left the windy shoreline and headed into the beckoning woods. We were anxious to explore some old growth forest. The towering trees above the streams and ocean just might be sheltering fresh mushrooms all aglow on the damp forest floor.
It was not long before my friend and I wandered away from each other while searching for mushrooms. We made noise and called to each other periodically remaining in earshot. All of a sudden, I heard a piercing scream from my friend. I immediately thought that she had run into a bear! I dropped everything. Grabbing my gun in one hand and my can of bear spray in the other, I ran in the direction of my friend's scream. She was not far away. To my astonishment, there she stood with a huge smile on her face and a big mushroom in her hands!
A magnificent KING BOLETE!!!

We found several more KING BOLETES nearby.
We hiked on back to the boat and fired up the stove for dinner.
This is a look at a KING BOLETE sliced open:

The KING BOLETES were quickly cleaned.

All were sliced and dry sautéed.

We browned the KING BOLETES in butter and devoured them with dinner. The flavor was mild and nutty. SOOOO GOOD!
I am not sure if KING BOLETES are extraordinarily delicious... or I just think that they are because they are so darn difficult for me to find!!!
Not only are they a rare find, but they are rarely in good shape when found. Here is a very young KING BOLETE growing up from the ground in great shape:

Unfortunately, there are some worm-like bugs that have radar or a super nose for KING BOLETES. I left the mushroom (seen in the photo above) in the ground overnight hoping it would increase in size. It was in the woods not far from home. When I returned the next day, it was riddled with bugs. Best not to walk away from a healthy KING BOLETE!!! Harvest it there and then!
Another heartbreaking feature about KING BOLETES is their rush to old age. Just suppose one of these mushrooms is not attacked by bugs and worms. In a surprisingly short period of time, a lovely, firm KING BOLETE like the one seen above transforms into this:

Strikingly beautiful, though, isn't it?
MUSHROOMS AND ART
My very first year living in Sitka, 1975, was when I was introduced to art work on bracket fungus. Anne Aitken showed me a drawing she had completed on a chunky, woody mushroom. She said she had recently removed it from a dead, rotting tree in the woods. Fascinating!
The winter holidays were coming up and I was pretty broke. Maybe I could find some of these "artist conks" and try my hand at drawing on them.

Well, success was not quick and easy.
It can take a while to locate this particular bracket fungus, Ganoderma applanatum. But, what better incentive to hike in the gloomy, dark rains of fall and winter than spotting the glowing surface of Ganoderma applanatum. I found at least one on each hike and recorded locations in a notebook for future reference. The same rotting tree would produce these fungi year after year until the tree finally rotted away.
The pale surface on the newest growth ring of Ganoderma applanatum immediately turns brown where scratched. Transporting the fungus out of the woods without damaging the moist surface is tricky. Branches and bushes reach out from everywhere. And, it is not unusual for me to slip and fall on the uneven forest floor. The pristine surface of Ganoderma applanatum would then be subjected to abrasions... or worse.
Long story short, it took years of experimentation and practice to locate, harvest, transport, draw and dry these amazing mushrooms to my satisfaction.
For over 40 years now I have used needles to scratch lots of local wildlife onto the surfaces of lots of Ganoderma applanata. It has been challenging and satisfying to complete pieces well enough to give as gifts or to sell at local craft fairs. Here is an explanation note often enclosed in gift packages:

The size and shape of each bracket fungus is unique.
A friend found several (shown below) when we were out harvesting some fall plants. She gave them to me.
 |
| Photo by Hope Merritt |
I have always found seals to be enchanting. When I examined the surface of the fungus displayed above, I saw that branches had grown into and altered the surface in two spots. I imagined the spots as eyes. Perhaps an ocean scene including curious seals?
The surface of Ganoderma applanatum dries rather quickly once it is removed from a rotting tree. So, out came my needles and the surface was scratched the next two evenings. My friend asked that I add the name of her business for use in a display. Here is the outcome:

Nowadays, my eyes are dimming and my hand is no longer steady.
I rarely draw on bracket fungi anymore.
If your hand is steady and your eyes are sharp, give it a try!
It is a most enjoyable activity during fall and winter.
Another bracket fungus, Fomitopsis, is quite abundant in our enchanting forest.


However, once dried thoroughly, artwork on Fomitopsis with paints and brushes is a common sight.
One of my daughters surprised me with this painting of an octopus on Fomitopsis. 12" wide X 10" high.
Wow! A remarkable and cherished gift!

Enjoy painting? Give it a try on Fomitopsis. There is such a wide range of sizes and shapes. Each one is so unique. The size and shape will often trigger your imagination fairly soon after the find.
Be extremely careful sawing or cutting bracket fungus off of a tree. It can be super simple or really challenging depending on several factors. Cutting your enthusiastic self while deep in the woods is not a reality you want to face.
Thanks for the great post and endorsement, will try to do my best to live up to it. Especially thanks for mentioning Mark Moats; I have great memories of you two scouring the woods for fungi during class.
ReplyDeleteExcellent writing
ReplyDeleteBest blog I've seen for a newbie forager like me!
ReplyDelete