For me, there is nowhere on earth as enchanting as an ocean intertidal zone.
An opulent intertidal zone never fails to nourish body and soul.
 |
In an article written by Sandra C. Lindstrom named
The Biology of Seaweeds in Southeast Alaska, the main conclusion is that
"Southeast Alaska has the most diverse seaweed flora of any region of Alaska."
It was a book by Rita M. O'Clair and Sandra C. Lindstrom that clarified so much for me about seaweed:

Then, lucky for us, Sandra C. Lindstrom teamed up with Mandy R. Lindeberg and published one heck of a field guide to seaweeds. Over 100 of our most common seaweeds are described in detail with color photos on water resistant pages:

EATING SEAWEED
One of the reasons I appreciate help with seaweed identification is because I like to eat seaweed. This is nothing new nor all that unusual. People have been eating seaweed here and throughout the world since way back in time.
When it comes to location, it is wise to use caution when gathering seaweed. Best not to gather seaweed from shorelines close to a community of people or other sources of pollution. Seaweeds readily absorb pollutants.
Many, but not all, seaweeds are best gathered in the spring and early summer. The flavor and quality is often best when seaweed has matured some, but is still young and tender.
Although all seaweeds contain green chlorophylls, they do not all appear green. Some seaweeds contain enough other pigments that they appear brown or red instead of green.
As a result, botanists divided seaweeds into three major groups based on color alone: BROWN, GREEN and RED. Simple.
SOME BROWN SEAWEEDS I LIKE TO EAT
in alphabetical order
BROWN SEAWEED #1
ALARIA
 |
| Alaria is in the foreground. Porphyra abbottae (also known locally as "black" seaweed) often grows just above Alaria. |
Alaria marginata is also known as winged kelp. Because it is nearly identical, some people call it wakame... although wakame is actually a different species found in waters off Japan. Alaria was introduced to me here in Sitka by an amazing friend, Jeanne Longstreth. It has become a kitchen staple for me. Thank you so much, Jeanne!
I like to gather Alaria at low tide in May and June. Alaria is still available for harvesting throughout summer and into fall. It gets pretty beat up as the summer progresses.
Do not pull Alaria off of rocks to harvest. You will see that there is a circle of short blades surrounding the main blade at the base where Alaria attaches to rocks with a holdfast. This is the reproductive section. So, cut the blade off a foot or more above the base. Use scissors, a knife... or simply bite it off as I do. For transport, I like to place harvested seaweed into clean plastic totes or clean cotton pillow cases, depending on the size of the seaweed. Alaria, with its flattened midrib, can grow to a length of 10 feet. Alaria gets the tote.
Fresh Alaria only holds up well in the refrigerator for a few days. If you harvested more than you will be eating in the immediate future, plan on freezing or drying.
Enjoy eating some fresh.
- It makes great rollups filled with veggies, rice and meat.
- Roll a fish fillet in a section of the blade and bake!
- Cut up, marinate and eat as an appetizer.
- Chop and add a cup when making basil or kale pesto.
- Chop up the crunchy midrib and saute.
- Chop midrib and add to salads.
- Chop and add to stir fries or baked dinners.
- Steam with garden vegetables & blend into a creamy soup.
Freeze Alaria fronds in sections to use for rollups and other cooking at a later date. Alaria keeps well in a freezer for many months... especially if vacuum sealed.
Dry Alaria soon after harvesting. Dried pieces of any size reconstitute quickly in water to nearly the same as fresh!

Seems like we usually get lucky and have a few sunny days after harvest to hang the Alaria out in the the yard to dry in the breeze. Above, I fastened the Alaria to a clothesline with clothespins... until I ran out of pins. It worked just as well to toss the Alaria blades over the line without a fastener as seen below.

It only takes Alaria one day to dry if there is full sun and a breeze. Without these prime conditions, try drying the Alaria under cover protected from rain, somewhere like a garage or deck, for a day. Once partially dry, I string a clothesline in my living room in front of the wood stove and hang the Alaria there until it is totally dry. Another option is to use a dehydrator. We have a large one. Or, dry briefly at the lowest temperature in your oven. Our dried Alaria blades are then stored in an air tight five gallon bucket with a screw on lid. The bucket lives in our cool garage along with other buckets full of nutritious, dehydrated yummies.

Alaria has such a mild flavor that it might be described as tasteless. Consequently, once dried, I like to turn the dried Alaria fronds into powder... and use this nutrient rich seaweed in almost everything we eat! It is quite simple to do. Using small amounts at a time, break up some dried fronds and place them in a food processor or blender. Start and stop (pulse) the blender several times until it all turns into either tiny flakes or a salt like powder. I keep a large jar of powdered Alaria handy in the kitchen. A tablespoon or more gets added to soups, stews, chowders, chile, stir fry, omelets, quiche, home made noodles, pancakes, bread, cookies, cakes... pretty much everything!
 |


 |
There are an enormous number of recipes out there with Alaria included. One of my heroes, Evelyn McConnaughey, presents nearly 50 Alaria recipes in her seaweed guide! She often includes Alaria in recipes as you would include cabbage, kale or spinach. I love this book.

BROWN SEAWEED #2
FUCUS

Fucus distichus subsp. evanescens was formerly known as Fucus gardneri. Some common names are rockweed, popweed and bladderwrack. I just call it FUCUS. There is an enormous amount of FUCUS on our beaches. It is visible during any low tide.

I first became aware of FUCUS as a food about 40 years ago while chaperoning a bunch of young children for a spring day on a beach. Another chaperone instructed the children to pick some FUCUS tops that did not have puffy sacks or "poppers" on them. (Depending on the maturity of the FUCUS, the poppers often contain an unappetizing, slimy liquid or mucus). He pulled out a large thermos of fresh, hot water and poured it into a pot under which he had started a small fire. We were all about to prepare what he called "magic" food! Once the water was good and hot, each child briefly dipped their FUCUS into the hot water. The FUCUS turned from golden brown to brilliant green! After letting them cool a bit, all of the children readily ate and enjoyed their "magic" food!
 |
| Two home grown children standing in FUCUS. |
Young FUCUS tips harvested in late April or early May when they are a bright yellow, are tender and delicious when chopped and added to salads and stir fries. It is at this stage, too, that people have enjoyed a tea made from dried and powdered FUCUS. I love stirring a teaspoon or two of the powder into a cup of hot chicken broth for a soothing winter evening drink.
 |
| Eagles feasting on herring atop young FUCUS. |
Usually in early May, the FUCUS tips will begin to swell and fill up with a mucus in preparation for reproduction. It is at this point in maturity that I like to harvest the bulging tips. Use a knife or scissors. Once these tips have dried completely in the sunshine or dehydrator, they are quite a treat. The mucus interior dries into a crunchy honey comb.
 |
| Dried FUCUS "poppers" |
Dried FUCUS poppers are a popular treat for both young and old. Eat as is or added to a bowl of popcorn or trail mix. The taste is a little salty and somewhat buttery! So, if you add these dried poppers to popcorn, you may find no need for butter and salt.
 |
As summer progresses, the mucus tips on the FUCUS transform to air filled sacks and are no longer as inviting as a food.
 |
| FUCUS past its prime late in June. |
It is easy to determine whether the sacks are filled with air or mucus. Simply puncture one with your fingernail. Fortunately, I have found FUCUS at the mucus stage here and there on beaches throughout the summer. It appears that not all FUCUS grows and matures at the same time and rate.
 |
| FUCUS scattered in beach asparagus and grass. |
Same as the powder, dried FUCUS poppers store very well in an air tight container in a cool, dark location. I like to get a fresh supply each spring, although I think they would store well beyond a year.
 |
| Momma bear and cubs grazing above the FUCUS bed. |
BROWN SEAWEED #3
Eualaria fistulosa
This canopy forming kelp was formerly known as Alaria fistulosa. The common name is DRAGON KELP.
While skiffing around a remote bay quite a few years ago, I noticed what looked like incredibly long Alaria floating on the surface at low tide... like 50 feet long! This was one of the many times I was quite sure that I was living in a fantasy land! It was midsummer. Upon closer inspection, the midrib looked different from alaria marginata. The midrib had hollow, gas filled chambers. When I broke off a piece of midrib and tasted it, what a surprise! It was sweet, crunchy and palatable!
I intend to experiment more with this seaweed.
Although I do not yet have an original photo of dragon kelp to share with you, I will soon. I love the look of this seaweed.
BROWN SEAWEED #4
Macrocystis pyrifera
 |
Years ago, it was almost impossible to find this particular seaweed in Sitka Sound. Ask any of the permit holders who gathered Macrocystis pyrifera to use in pens for the roe-on-kelp fishery during the annual spring herring spawn.
Times have changed. Since the reintroduction and subsequent explosion of the sea otter population in Sitka Sound, we are lucky if our boat propellors do not tangle in Macrocystis pyrifera any time we leave the main channels! Sea otters love to swim down and eat the little critters that are busy eating away at seaweed holdfasts. With the gradual reduction, if not elimination, of many little bottom feeders, huge stands of seaweed have taken hold... in particular Macrocystis pyrifera. But, this is not the place to mourn the loss of such critters as urchins and abalone. Rather, this is the place to celebrate the glory of Macrocystis pyrifera. And glorious it truly is!
Macrocystis pyrifera is perennial. It lives and grows for up to ten years. From its holdfast, it branches out and reaches lengths as long as 200 feet. Yikes!

The countless, wrinkled blades on this seaweed have what looks like jagged teeth all around the edges. Each blade has a small, gas filled float at its base.

Individual blades typically survive up to a year. New growth on stipes replaces old.
Because it is perennial, Macrocystis pyrifera is visible and available for harvest year round. However, I read that this kelp is nutritionally at its best before the ocean water temperature rises in summer.
It is rare to access Macrocystis pyrifera from shore even during our lowest of tides. Best to plan on harvesting this seaweed from a boat. It is this seaweed that is harvested in massive quantities commercially along the U.S. west coast. It has many uses. It is often Macrocystis pyrifera inside the kelp capsules sold in health food and grocery stores. Just as the commercial harvesters are required to do, it is wise to utilize the blades and bulbs from the uppermost growth of Macrocystis pyrifera so as not to disturb or interfere with the reproduction of this perennial. Use a knife, scissors or your teeth to cut off what you need, leaving the rest intact.
Yes, Macrocystis pyrifera has many uses.
- Dry the blades, break them up and blend into powder.
- Thinly slice the small bulbs when fresh and add to stews
and stir fries. Use the thin slices as a pizza topper.
- Slice and pickle the bulbs!
- Wrap and bake a fish fillet in a fresh blade.
- Make a crispy snack:
Dry the blades into chip size pieces.
Cover the bottom of a fry pan with about an inch of
vegetable oil. Heat the oil to medium high, 375 degrees or
so. Drop the kelp chips a few at a time very briefly into the
hot oil. Remove and drain. I learned how to make this
delightful snack in the nutrition and cooking section of
the informative book below:
 |
The very best way to eat Macrocystis pyrifera???
OCEAN FRIES
 |
Let's start at the beginning so you get it all right. Believe me, it is worth doing this right.
The Macrocystis pyrifera blades used to make OCEAN FRIES are coated front and back with herring eggs. So, you will need to gather these seaweed blades a few days after the herring spawn late March/early April. Don't wait too long! You don't want the herring eggs to start maturing.
In case you did not know this, before you can harvest herring spawn on Macrocystis pyrifera, you need to get a subsistence permit.
Go to the Alaska Department of Fish and Game downstairs in the Court Building across the street from the Fire Hall.
Here is the free permit you will need to acquire annually:

Once you have your permit, you are good to go.
We go out at low tide in our skiff and find a location where the herring have obviously spawned. Avoid sandy beaches. Look down into the ocean until you see some Macrocystis pyrifera blades sunk down deep, glowing and heavy with eggs. It looks like this:

Take a pipe pole or something similar, reach down and snag the seaweed. Carefully pull it up and remove some of the egg covered blades. Look for blades with a good coating of herring eggs on both sides. I simply break off the blade just below the little float leaving the float behind. No need to detach the seaweed from the ocean floor. Layer the blades in a container. Munch on a chunk. Delicious. BEAUTIFUL.
Once we get it home, we slice the blades into manageable sized pieces approximately 4" by 6". No rinsing or anything.
 |
We can't resist eating some right away. It is simply delicious to cut some up into small cubes, dip cubes into a favorite dipping sauce, add a touch of wasabi and enjoy!
When all of the blades are cut up into approximately 4" by 6" pieces, We set several pieces aside to make ourselves some fresh OCEAN FRIES. Then we take all the rest and stack them four or five pieces high. Each stack gets packed in a bag and vacuumed. We freeze plenty of packs so we can enjoy this wonderful food throughout the year. It freezes remarkably well... terrific texture and flavor even a year or more later.
Now...to make the quick and easy OCEAN FRIES:
Start heating about four inches of some kind of vegetable oil in a deep pan. I prefer avocado oil when available.
Or, heat the oil in a deep fryer to 375 - 400 degrees.
Cut the fresh egg covered seaweed into french fry sized pieces.
If you are using frozen egg covered seaweed, thaw first. Then, slice into french fry sized pieces. You will notice that, after thawing, it might be drippy wet. If so, set the pieces atop a clean cloth or paper towels to drain for a few minutes. Gently pat them with another cloth or paper towel to remove a little more moisture.

Notice the seaweed sandwiched inside the herring eggs:

Place a cup or so of white flour in a bowl or plastic bag.
Roll the pieces in the flour until well coated.
Shake off excess flour.
 |
Fry the coated strips in the hot oil a handful at a time.
Cook until golden brown 3 to 5 minutes depending on oil temperature and thickness of fries.

Remove the fries when golden brown and set them on a paper bag or paper towel to drain off any excess oil.
 |
Enjoy your crispy, hot OCEAN FRIES!
Eat them plain, with ketchup or dipped in your favorite dipping sauce.
BROWN SEAWEED #5
Nereocystis luetkeanus
 |
Nereocystis luetkeanus, also known as BULL KELP, is another large, canopy forming seaweed. Unlike Macrocystis pyrifera, bull kelp is an annual living only one year... although some live on a second year. This seaweed usually grows where the ocean currents run fast. We see this seaweed growing in the swift moving channels between and around our many nearby islands. Bull kelp attaches to the ocean floor with a hefty holdfast. The holdfast below washed up on a beach in winter.
Up from the holdfast comes a single cylindrical stipe growing to lengths as great as 100 feet before terminating as a hollow, gas filled bulb.Three curious seals were hiding in the bull kelp bed below:  The bulb is topped with many lengthy blades. These blades grow 30 feet or more and are often seen with dark patches called sori. The sori develop for reproduction. They grow on the blades until mature and then drop off and down to the ocean floor below. The blades are left with gaping holes. |
 |
| photo by Hope Merritt |
Every once in awhile, I enjoy searching on the internet for seaweed information and recipes. One such time, my focus was on bull kelp. Was I ever surprised when up popped my botany professor from nearly 50 years ago when I attended the University of Massachusetts! Yes! Dr. Ryan Drum, an inspiration to many, established a business named Island Herbs in Waldron, Washington. What a wealth of information he shares on his website about food and medicinal uses of sea vegetables. Dr. Drum even offered a video about bull kelp... which I readily purchased:
 |
Probably the most popular way to eat bull kelp locally is to pickle it. The hollow stipe just below the bulb is cut into thin rings.
 |
To pickle is to saturate and preserve in a variety of flavors... sweet or savory. See my post on beach asparagus to get a detailed explanation of pickling.
http://sitkavores.blogspot.com/2015/07/beach-asparagus.html

Bull kelp salsa is another local favorite. There is a salsa recipe in this wonderful little book by Southeast Alaskan, Dolly Garza:
 |
 |
But, it is the uncooked blades growing from the top of the bulbs that I find to be most inviting. They are delicious and remarkably nutritious. Dr. Drum describes the dried blades as "scrumptious." Harvest some blades for yourself and see what you think.
Here is how to go about harvesting bull kelp blades...
- Start keeping an eye out for healthy, mature bull kelp
around the end of June. Harvest time depends heavily on
our weather. You know our weather can vary dramatically
from year to year. Bull kelp can be harvested year round,
but we are aiming to harvest it at its prime.
- As with other canopy forming kelps, you will need to gather
bull kelp from a boat, preferably at low tide. The bulbs and
blades will be seen floating on the ocean surface.
- Bull kelp can often be found hereabouts just a little deeper
and outside of Macrocystis pyrifera beds.
- We are looking for blades that are substantial and long...
they grow as long as 60 feet and anywhere from 6 to
12 inches wide.
- Once you find mature blades to your liking, I encourage
you to be conscientious. Only cut off the number of blades
you are sure you will use. Several blades go a long ways.
For the sake of further growth and reproduction, take only
a few blades from the top of each individual bulb. Cut the
blades off a foot or two above the bulb. Place the harvested
blades in a tote or pillow case for transport.
- Plan on drying your bull kelp blades as soon as possible.
Do not rinse blades in fresh water.
Hang the blades on a line in the sun in a breezy location if
possible. They will dry as quickly as one day. If you do not
have a sunny day, hang them indoors. I use a clothesline in
front of my wood stove and turn on a fan. When dry, the
blades will appear green/black and feel quite brittle.
 |
| The sori, dark patches, are unusually flavorful when dried and eaten as a snack. |
When completely dry, leave as pieces and/or blend into a
powder. Store in an air tight container in a cool location.
I like to keep an air tight glass jar filled with dried bull kelp
handy in the pantry for snacking. Like most seaweeds, bull
kelp's noticeably salty taste is pretty much POTASSIUM,
not SODIUM.
 |
When a purchase of dried bull kelp is made from Dr. Drum's Island Herbs, the insert reads, "This kelp can be eaten and enjoyed as is; it can also be added to salads, soups, baked or steamed vegetables, oatmeal... and any cooked dish from cookies to pancakes to scrambled eggs to ice cream."
BROWN SEAWEED #6
Desmarestia aculeata
 |
This coarse, branched seaweed will grow to a length of
six feet or more. It is not good to eat. Not at all.
 |
SOME RED SEAWEEDS I LIKE TO EAT
in alphabetical order
RED SEAWEED #1
Palmaria mollis
 |
Dulse is the earliest spring seaweed we harvest. It is biennial with blades appearing the second of its two years. Most years, dulse is at its prime the first two or three weeks of April. The weather can still be quite challenging here in April, but it is worth battling wind, rain and surf to acquire prime Palmaria mollis! For access, you will need to be on a beach growing Palmaria mollis at approximately a minus 1.0 or lower tide. Otherwise this seaweed will not be exposed. This happens to coincide with the time of year that the herring spawn, so you might have to hunt around if you want Palmaria mollis without a covering of herring eggs.
Although, it is delicious with herring eggs, too!
Once harvested, I like to munch on fresh dulse as is.
It is also really good cut into small pieces or sliced into thin spaghetti like strips and added to salads and stir fries.
For other uses of dulse, I dry this seaweed first.
Lay the seaweed out on a sunny breezy day on a clean white sheet atop a table.
Or, hang the dulse on a line in the sun and breeze.
Or, dry indoors on a line in front of a heater or wood stove with a fan going.
Dulse does not dry to a crisp. It can feel a little rubbery even when totally dry.
For a yummy treat, cut the dried dulse into bite sized pieces. Drop the pieces into a few inches of hot oil very briefly. Try sesame oil for a unique taste. They will puff up a little. Remove and drain on a paper towel. The result is a crispy chip!
I like to store the remainder of my dried dulse in an air tight container. I take some dried pieces out periodically and pulse them in a blender to make flakes or powder for use in bread and other baked goods, omelets, stews, vegetable dishes, smoothies etc. Not only does it add nutrients, but dulse adds a delicious, nutty flavor.
 |
RED SEAWEED #2
Porphyra abbottiae
 |
Porphyra abbottiae is an annual seaweed lasting only one season. It is known locally as BLACK SEAWEED.
This seaweed is so popular hereabouts that, without question, if someone says, "I have some dried seaweed for you," it will probably be Porphyra abbottiae.
It was many years ago that my friend and co-worker, Pauline Duncan, told me to look for BLACK SEAWEED at its best in quality and flavor around Mothers' Day... early to mid May.
Pauline wrote about seaweed and much, much more in her delightful book:
 |
It is possible to access BLACK SEAWEED by land or boat when there are minus low tides in May. The readiness of this seaweed is influenced by sun, rain and the temperature of the air and ocean water. Both flavor and quality are obviously diminished when the rains are heavy in April and May. Fortunately, our rain has been known to back off in May. Starting in late April, look for some sizable patches. Keep your eye on these patches if possible.
- Look for seaweed about a foot or more long.
- The color should be a rich greenish red color... not faded.
- It should be stretchy.
When it is time to harvest, remember not to take more than you will use. Try to move around rather than harvest all from one rock. Tug gently on a blade or two and they will readily come free. Take the time to rinse the seaweed off in salt water to release any little critters like periwinkles clinging to the blades. Place your seaweed in a clean cotton pillowcase so it will drain nicely in transit.
Porphyra abbottiae is not a seaweed to eat fresh. It is the drying process that brings out its best. As it dries, it turns shiny and black.
 |
The next day, cover a table or something like a large piece of plywood with a clean white sheet. Spread the seaweed out over the sheet.
As it dries, break the seaweed into smaller pieces and turn it over frequently throughout the day. If it is a sunny, breezy day, the seaweed will dry in one day. If it is not sunny, I like to dry the seaweed completely in a dehydrator set at 115 degrees. Because this seaweed bunches up as it dries, it is important to dry it all completely before storing. If it is not completely dry, it will gradually get moldy.
Once completely dry, store your BLACK SEAWEED in an air tight container in a dark, cool location.
 |
Black seaweed is enjoyed most often as a healthy snack.
Instead of grabbing a bag of potato or corn chips, enjoy a handful or two of crispy, crunchy black seaweed!
Crispy, dry black seaweed is easily turned into flakes or powder by pulsing in a blender. The powder is useful same as with other seaweed powders. Add this seaweed powder to breads and other baked goods, green drinks, smoothies, soups, stews and more.
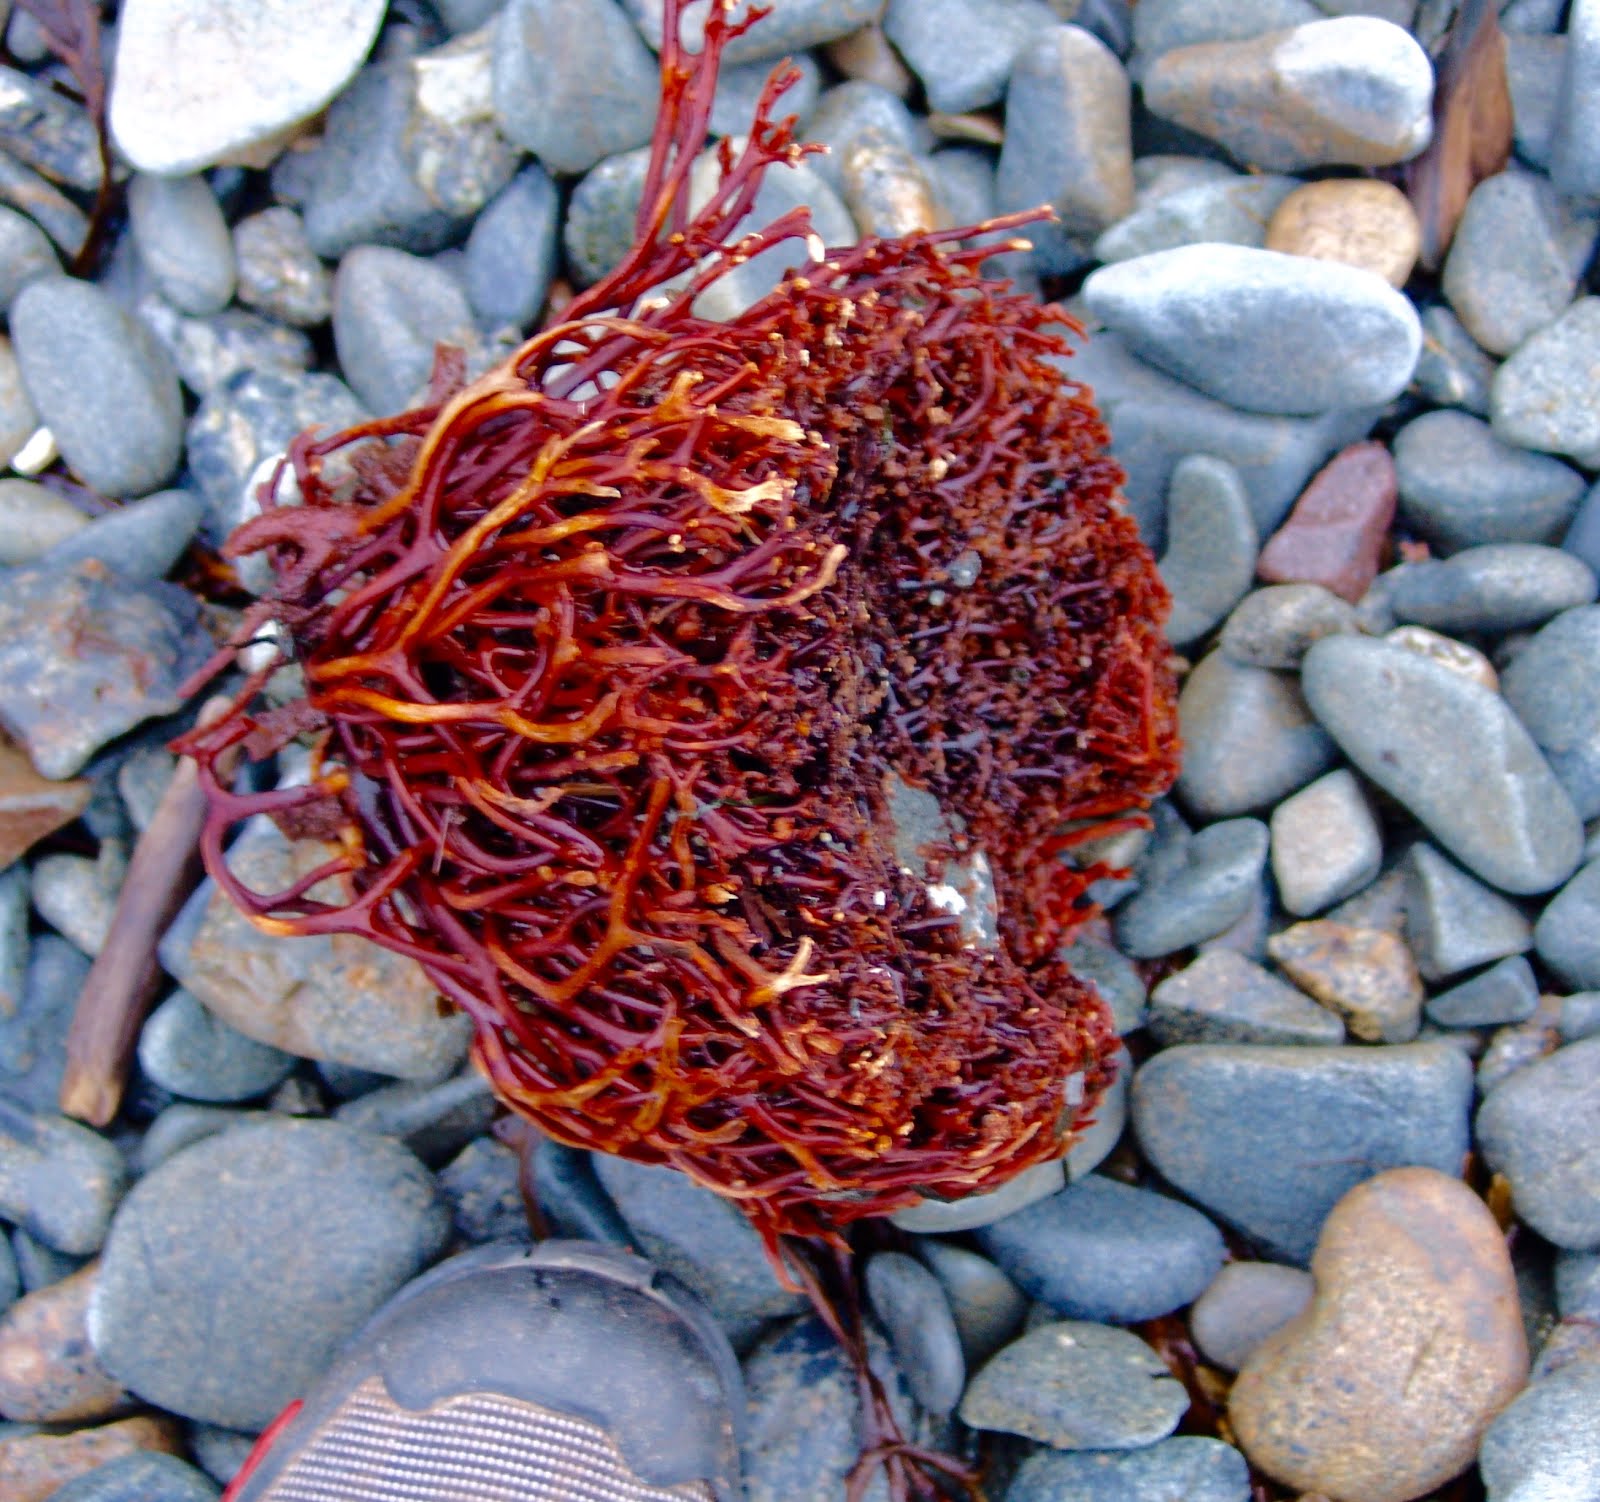
RED SEAWEED #3
Porphyra nereocystis
Porphyra nereocystis is also known as BULL KELP LAVER.

Oh my! This photo does not lead one to believe that the flavor of this seaweed could ever possibly rank up there with pistachio nuts, deer jerky, a turkey dinner, peach pie, pizza, chocolate chip cookies, smoked salmon or your favorite ice cream! No. This looks murky and disgusting.
What you are looking at in the above photo is a nearly dead, old bull kelp stipe. Bull kelp laver actually grows on old bull kelp stipes.
Bull kelp laver is always submerged.
Here is how it looks under water:

I am not sure why, but when the sun is shining and you look down into the ocean, the beautiful, red bull kelp laver has golden twinkles!
The first time I tasted this seaweed, it was fresh out of the ocean. Pretty tasteless and remarkably thin...only one cell layer thick! I don't recommend eating bull kelp laver until it is dried. Once dried, the texture is excellent. The flavor is divine... with a hint of clam. I find this to be the most flavorful of all dried seaweeds.
Not only is dried bull kelp laver delicious, but it is remarkably nutritious. It is high in many vitamins and minerals and has 50% more vitamin C than oranges!
Harvest bull kelp laver early in the season. We usually go out by boat during any low tide in late April through May. Look for murky old bull kelp floating on the surface. If it is hosting bull kelp laver, you will see quite a few long, narrow blades hanging down from the bull kelp stipe. Long lengths, five feet or more, will be swaying deep down in the ocean current.
Move around from one old bull kelp to another. Best to not remove all of the laver from each bull kelp. Just pull a portion of the laver off of each old bull kelp so as to support reproduction.
As you harvest the bull kelp laver, place it in a pillow case that is fitted inside a 5 gallon bucket... or something similar. Don't drain this seaweed entirely of salt water until you are ready to dry it. Leave it in the pillowcase inside the bucket until you are ready to dry it. It tends to melt if drained in advance. Do not rinse with fresh water.
Bull kelp laver dries well in sunshine hanging from lines. It also dries well on a clean white sheet on a flat surface. The photo below shows it drying both ways:

Here is a closer view of the line dry method in the foreground. That's laver in the front, Alaria in the back:

A close up of line drying laver:

This is a closer look at bull kelp laver nearly dry on a sheet:

If the weather does not cooperate for drying, a dehydrator is a good alternative... or hang it indoors on a line near a wood stove or heater. Turn on a fan!
We share a lot of our bull kelp laver. It stores well for a year or more in an air tight container in a cool dark location.

Bull kelp laver must be crispy to be enjoyed. If it is not quite crisp enough, pop it into your oven on a cookie sheet at the lowest temperature for a few minutes. So so delicious!
So, there you have it. Some of my favorite seaweeds to eat. There are plenty more for you to enjoy. It is a matter of taste, so I encourage you to do some experimentation of your own.
I don't want to move on with discussion of some other uses of seaweed without first mentioning an outstanding cookbook. It was written by Prannie Rhatigan, a medical doctor who has been harvesting and cooking with seaweed since childhood in Ireland. Prannie Rhatigan is also an organic gardener. The recipes are remarkably good. The photos will likely cause you to drool!

SEAWEED IN THE GARDEN
We have been gardening at the same location here in Sitka for over 30 years. We have used basically the same approach each year because it has worked so well for us.
Almost without fail, sometime in April, after the herring spawn in Sitka Sound, we get some stormy weather. The powerful tides and currents rip some of the seaweed, heavy with herring eggs, from the ocean depths. It gets tossed up onto the high tide line of beaches.


Here is a close up view:


This seaweed, with a spattering of herring eggs, might stay at the high tide line for a day... or a week. It all depends on the height and forcefulness of the ensuing high tides. We keep our eye on the beaches and gather this wonderful garden fertilizer while the getting is good... before it is swept away by the forceful ocean.

Once home, we layer this seaweed mix over the top of our garden beds. It gets mixed into the beds with a rototiller before we shovel the soil up into raised rows. It is important to incorporate the seaweed mix into the soil as soon as possible because it gets gooey and unmanageable if you let it sit.
You can barely see the seaweed once it has been mixed in with your soil. This photo shows the fluffy soil in raised rows after tilling in the seaweed mix:

Growing fruits and vegetables in this soil is magical!!!
In the fall, a series of storms brings a slightly different pile of seaweed to the high tide line. Every kind of seaweed, loosened by storms, is washed up and mixes in with the fallen leaves and evergreen needles. Just as in spring, it can be pulled back out to sea by rough, high tides.
Gather some up before its gone!

We love to gather this mix and use it to mulch our perennials. It protects plants and bushes from freezing temperatures. It breaks down gradually and adds nutrients as well. Double duty.

Another use of the fall seaweed mix from the high tide line is compost. We have piled the seaweed mix high, covered it with breathable construction cloth and turned it periodically throughout the winter. Come spring it has transformed into lovely soil for the gardens.
Seaweed has so many more uses beyond what I have shared in this blog post! I encourage you to investigate, explore and experience seaweed for improved health. Seaweed is found in soothing bath salts, soaps, shampoos... the list goes on and on. Mix the various seaweed powders together and you will be well on your way to making your own useful products! I am currently enjoying a lot of the information found in this book:

Best wishes for wild and memorable adventures with seaweed.
Wonderful Florence! Thanks for sharing.
ReplyDeleteWelcome!
DeleteThis is crazy, I never realized that we had do many edible seaweeds in Sitka.
ReplyDeleteBotso
Tip of the iceberg, Botso!
DeleteExcellent source of information as usual. Thank you Florence.
ReplyDeleteGlad you enjoyed it, Jaclyn!
DeleteThis comment has been removed by a blog administrator.
ReplyDeleteThis comment has been removed by a blog administrator.
ReplyDelete