Even though, for practical reasons, I am attracted to perennial flowers, I have also grown a wide variety of annual flowers in our gardens.
Typically, I would first see a stunning annual flower growing in someone else's garden. Lucky for me, the gardener would almost always offer me seeds.
Otherwise, there were those ever alluring seed catalogs drawing me in with wonder and breathtaking photos.
Nowadays, we have several local businesses displaying and selling attractive packets of seeds and healthy starter plants.
This post will feature some of the annual flowers I have most admired in our own gardens. This admiration is often a consequence of how suited the plant is to our unusual climate. The annuals will appear in alphabetical order using common names.
Below is a list of the annual flowers in this post:
CALENDULA
CHINESE FORGET-ME-NOT
CINERARIA
HELIOTROPE
JOHNNY-JUMP-UP
MARIGOLD
MORNING GLORY
NASTURTIUM
NEMESIA
ROSE MALLOW (LAVATERA)
STRAWFLOWER
SUNFLOWER
SWEET PEA
CALENDULA
Calendula officinalis

Because Calendula have always done so well in our gardens, I like to start a flat of 4" pots in March or April. I plant 4 or 5 seeds in each pot. They are not at all fussy.
Calendula are also inclined to self-seed. Seeds from the previous years plants sprout and bloom in our gardens as early as the end of May. We have Calendula blooming well into fall.

I find the bright colors, sturdiness and fragrance of calendula to be most welcome.
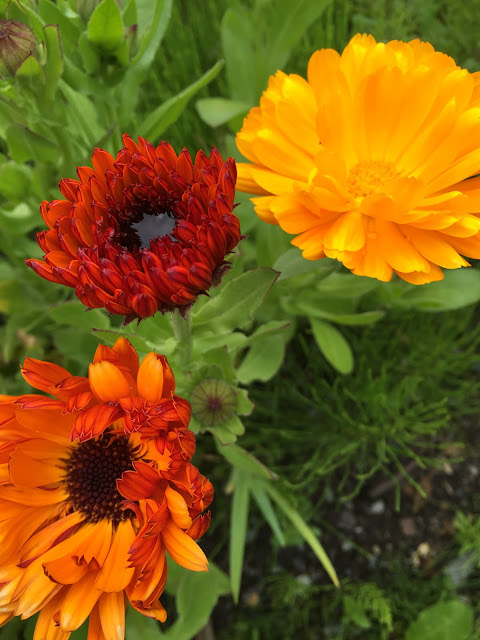
I usually let the volunteers grow wherever they please.

They transplant well, too. If the seeds sprout and the plants are too close together, I simply dig some up when they are tiny... and transplant them wherever there are spaces in our gardens.
Although somewhat bitter, the flowers and leaves of calendula are edible.
Here are some of the varieties of calendula we have grown:

CHINESE FORGET-ME-NOT
Cynoglossum amabile

It was Les Brake who connected me with chinese forget-me-nots. He is generously inclined to share packets of home grown seeds and plant starts with other gardeners. Les is probably more in touch with the beauty and effect of gardens than anyone else. He gardens up north in Willow, Alaska. In spite of way too many gardening challenges in his neck of the woods, his gardens are beyond heavenly.
Here is a photo of me visiting with Les Brake in his inspirational gardens.
It is such a treat to grow these indigo blue forget-me-nots on their own, or to sprinkle them in amongst other colors.

I like to harvest seeds in the fall from this annual variety of forget-me-nots. Watch out! If you rub up against the mature plants, your clothing will be covered with the sticky seeds!
I usually start the seeds for these flowers indoors in 4" pots anytime in March or April. The seeds might self-sow occasionally in your garden. You will see little volunteer plants emerge in May or June. They transplant well.
CINERARIA

Years ago, my adventurous friend, Penny Brown, invited me to travel to Vancouver, British Columbia. Talk about breathtaking gardens! Fragrant roses climbed clear over the tops of houses. Trellises were covered with huge clematis vines and smothered with giant blooms. Was this a dream? There did not seem to be a single home without a showy garden. Endless sidewalks were lined with frilly, colorful flowers.
Bright sunshine. No weeds. No slugs.
I had to be dreaming.
We hopped a ferry and visited Butchart Gardens in nearby Victoria, B.C. This was where I fell in love with cineraria flowers... especially when I learned that they are shade loving plants. I knew that Sitka, the shade capital of the world, could use some cineraria dazzle. So, I bought a handful of seed packets at Butchart's garden shop.

Growing anywhere from 18 inches to 3 feet tall, Cineraria plants produce a wide array of bright, daisy-like flowers. Although tender perennials in some climates, cineraria are annuals in Sitka.
Mature cineraria plants develop seed pods that look like tiny dandelions. The seeds are really tiny. There are countless tiny seeds produced on each plant. No need to ever buy seeds again! Shake the seeds off the plant onto a plate and dry them uncovered indoors for a week or two before storing. Be sure to label the container!
There are some very useful tools designed to distribute tiny seeds:

Start cineraria seeds early in the season... February or March. It will usually take 5 or 6 months for the plants to mature and flower.
Fill a casserole sized container with soil. Sprinkle seed over the surface. Cover the seed with a thin layer of fine sand or soil.

Gently water the surface until the entire container of soil is moistened but not soaking wet. I use the mist setting on my watering nozzle for this. Cover with clear plastic. Cineraria seed germination is enhanced with light. Place the container indoors on a seed warming mat or your warmest, well lit location.
Remove the plastic to moisten the surface regularly. Replace plastic cover. Cineraria seeds take up to three weeks to germinate.

Once the seedlings are an inch or so tall, lift them out of the soil with a spoon or fork. Gently separate the seedlings and plant one seedling per 4" pot using potting soil. Put all of the 4" pots on a tray and let the plants continue to grow indoors. Do not place in direct sunlight. Even these small plants like shade!
When it feels like it has warmed up enough outdoors, place the trays of cineraria (still in their 4" pots) outside in a shady spot like a covered deck or carport. No direct sunlight! They don't mind being somewhat cool during the day and night. It is wise to keep the cineraria plants growing in the 4" pots until you are ready to plant them in the ground mid to end of May. Letting them get somewhat root-bound improves their future growth. Fertilize the cineraria plants once at the beginning of April and again at the beginning of May with a liquid fertilizer. Follow the directions and do not over fertilize.
Plant the individual cineraria plants outside in fertile ground mid to end of May. They need a shady spot. It is best to plant cineraria under protective overhangs or under bushes or trees. We plant many cineraria plants in the shady parts of our covered garden. They don't handle rain very well once they flower. If the flowers are protected, they will be stunning from August through November. Water at ground level rather than spraying the flowers.
The flower color of each plant is always a surprise. There are so many colors!

Below are some close-ups of cineraria we have grown:


HELIOTROPE
Heliotropium arborescens

This is one of my favorite photos. A dahlia smothered in the tiny blossoms and striking foliage of marine heliotrope.
Although marine heliotrope is listed as a perennial, it has only performed as an annual for me here in Sitka. Whether planted out in the open, semi-protected under an overhang or fully protected in our greenhouse, marine heliotrope has not survived beyond one season for me. But that is okay! It is such a uniquely beautiful plant, I don't mind starting a bunch every year.
They are lovely bordering other plants.
They are lovely in bouquets.
And... bees love them.

Two of the seed companies selling marine heliotrope:

JOHNNY-JUMP-UP
Viola cornuta tricolor

Johnny-jump-ups are a variety of perennial violas growing as an annual in our gardens most years. But, they show up every summer as reliably as little kids at the best playground in town. After the first planting, the mature seeds are scattered around in the fall breezes. A good number of the seeds sprout the next year. And so it goes year after year. At least it has in our gardens.
And I am grateful for it.
Johnny-jump-ups are little and cute. Even the name is cute. They have goofy cartoon-like faces.
The flowers and leaves of this plant are edible. With a mild wintergreen-like flavor, people add them to salads, decorate desserts, make tea...
Triplets!

Looks like Violas named 'Johnny-jump-up' are one and the same as Viola 'Helen Mount'

MARIGOLD
Tagetes erecta

It seems pretty safe to say that big, bright, beautiful marigolds are about as popular as flowers can be!
I grew them outside in our gardens once about 30 years ago. Yes, only once. I am betting that there is no other flower growing in Sitka more inclined to attract slugs. There were more slime lines leading to the marigolds than imaginable!
Picking handfuls of slugs off of the marigold plants was a daily event.
Marigolds might do just fine growing in pots in a greenhouse or up away from the ground.
Best of luck if you decide to grow them!
MORNING GLORIES
Morning glories were a familiar sight in summer during my early years in New England. They grew wild and crazy.
Assuming that all morning glories would need more sunshine and heat than we experience here in Sitka, I decided to grow some indoors in our "sun" room.
MOONFLOWER
Ipomoea alba
 Moonflowers are not only stunning, but they are also incredibly fragrant. What a treat it was to have these 20 foot vines growing and blooming in our home throughout the summer.
The blooms were white and huge.

FLYING SAUCER
Ipomoea purpurea
The next summer, we changed it up and grew the morning glory known as 'flying saucers' in place of the 'moonflowers.'
Indoors in large pots filled with potting soil, we were delighted once again.

Here is a closer look at 'flying saucer'

HEAVENLY BLUE
Ipomoea Heavenly Blue
 The third morning glory we planted indoors is a very popular flowering vine. Along with the trumpet-shaped sky blue flowers, this morning glory plant produced dense, deep green foliage. Astonishing!
ROYAL BLUE ENSIGN MORNING GLORY
Convolvulus tricolor

I don't remember where I first saw this morning glory bush.
I do know that I was eager to give it a try in our gardens. I have been growing 'blue ensign' for more that 20 years now.
This low bush adds a beautiful blue border to gardens mid-summer through fall.

It seems best to start seeds indoors anytime in March or April. Most years I start a flat of 'blue ensign' using 4 inch pots with 4 or 5 seeds spaced in each pot. The plants form seed pods that mature well and keep gardeners supplied with plenty of seeds for the next year.If you plant the starts on top of a rock wall, part of the bush will stay upright and part will cascade beautifully down the wall a bit.
Here was one of my seed sources for 'blue ensign'

WILD MORNING GLORY
Calystegia sepium

Several decades have passed since I planted a chunk of wild morning glory in the far, lower corner of our yard.
Jerry Snelling, the Sitka Pioneers' Home gardener extraordinaire had warned me not to do this. He said the plant can be fatally intrusive in a garden.
"Well", I thought, "there is nothing down in that dark corner of the yard. It will be so beautiful filled with that beautiful vine with bright, white flowers."
And so it was for many years.
The past few summers have been warmer than years gone by.
The wild morning glory vine went crazy.
If Jerry had visited our gardens last summer, he would have thought, more likely said, "I told you so."

The vines grew up from the corner, under and around a staircase, up a little hill, over a trellis covered with clematis, around stands of ligularia and delphinium and up into a mountain ash tree. Bad news became even worse when I realized that this plant is not annual. It is perennial!
I worked diligently to untangle and remove the vines before they choked and killed any additional neighboring perennials.
Beautiful but deadly.
NASTURTIUM
Tropaeolum majus

I'm thinking that if Sitka had a FAVORITE FLOWER contest, the winner would be nasturtium. Nasturtiums grow well in cool, damp climates and require little fertilizer. They seem to be growing all healthy and beautiful around every corner. They are particularly beautiful cascading down from window boxes. Check out the window boxes at the PETS CHOICE VETERINARY HOSPITAL. Victoria Vosburg makes magic!
Until a few years ago, I had never grown a nasturtium. I am not really sure why. When a friend told me that she decorates and enriches salads with the edible nasturtium flowers and leaves, I decided to grow some. Nasturtiums have a peppery flavor.
Because of our somewhat short season, I start nasturtiums indoors in April in 4 inch pots... one seed per pot. They are planted outside by the end of May.
The short bushy variety, 'Alaska Mix', makes a nice border.

But, the best variety for our own gardens are the tall, trailing nasturtiums.

When planted at the top of our rock walls, the nasturtiums branch and trail down the walls 10 feet or more.

The yellow, red and orange blooms fit right in with so many other fall colored flowers.
Here are three of the companies supplying Sitka businesses with nasturtium seeds.

NEMESIA
Nemesia strumosa 'Paintbox'

Colorful annual flowers destined for cool climates!
Nemesia is a great addition to gardens in containers, along borders and in massive beds.
It seems best to start nemesia indoors in April sprinkling several seeds in each 4 inch pot. Cover the seeds ever so lightly with soil or sand. Plant outdoors in fertile soil in sunniest locations by June.
CALENDULA
CHINESE FORGET-ME-NOT
CINERARIA
HELIOTROPE
JOHNNY-JUMP-UP
MARIGOLD
MORNING GLORY
NASTURTIUM
NEMESIA
ROSE MALLOW (LAVATERA)
STRAWFLOWER
SUNFLOWER
SWEET PEA
CALENDULA
Calendula officinalis

Because Calendula have always done so well in our gardens, I like to start a flat of 4" pots in March or April. I plant 4 or 5 seeds in each pot. They are not at all fussy.
Calendula are also inclined to self-seed. Seeds from the previous years plants sprout and bloom in our gardens as early as the end of May. We have Calendula blooming well into fall.

I find the bright colors, sturdiness and fragrance of calendula to be most welcome.

I usually let the volunteers grow wherever they please.

They transplant well, too. If the seeds sprout and the plants are too close together, I simply dig some up when they are tiny... and transplant them wherever there are spaces in our gardens.
Although somewhat bitter, the flowers and leaves of calendula are edible.
Here are some of the varieties of calendula we have grown:

CHINESE FORGET-ME-NOT
Cynoglossum amabile

Here is a photo of me visiting with Les Brake in his inspirational gardens.
 |
| Photo by Penny Brown |
It is such a treat to grow these indigo blue forget-me-nots on their own, or to sprinkle them in amongst other colors.

I like to harvest seeds in the fall from this annual variety of forget-me-nots. Watch out! If you rub up against the mature plants, your clothing will be covered with the sticky seeds!
I usually start the seeds for these flowers indoors in 4" pots anytime in March or April. The seeds might self-sow occasionally in your garden. You will see little volunteer plants emerge in May or June. They transplant well.
CINERARIA
Years ago, my adventurous friend, Penny Brown, invited me to travel to Vancouver, British Columbia. Talk about breathtaking gardens! Fragrant roses climbed clear over the tops of houses. Trellises were covered with huge clematis vines and smothered with giant blooms. Was this a dream? There did not seem to be a single home without a showy garden. Endless sidewalks were lined with frilly, colorful flowers.
Bright sunshine. No weeds. No slugs.
I had to be dreaming.
We hopped a ferry and visited Butchart Gardens in nearby Victoria, B.C. This was where I fell in love with cineraria flowers... especially when I learned that they are shade loving plants. I knew that Sitka, the shade capital of the world, could use some cineraria dazzle. So, I bought a handful of seed packets at Butchart's garden shop.
Growing anywhere from 18 inches to 3 feet tall, Cineraria plants produce a wide array of bright, daisy-like flowers. Although tender perennials in some climates, cineraria are annuals in Sitka.
Mature cineraria plants develop seed pods that look like tiny dandelions. The seeds are really tiny. There are countless tiny seeds produced on each plant. No need to ever buy seeds again! Shake the seeds off the plant onto a plate and dry them uncovered indoors for a week or two before storing. Be sure to label the container!
 |
| Above is a plate of dried cineraria seed pods. Shake the whole mess in a closed container and the tiny seeds drop to the bottom. The seeds are the very tiny black specks in the foreground. |
There are some very useful tools designed to distribute tiny seeds:
Start cineraria seeds early in the season... February or March. It will usually take 5 or 6 months for the plants to mature and flower.
Fill a casserole sized container with soil. Sprinkle seed over the surface. Cover the seed with a thin layer of fine sand or soil.
Gently water the surface until the entire container of soil is moistened but not soaking wet. I use the mist setting on my watering nozzle for this. Cover with clear plastic. Cineraria seed germination is enhanced with light. Place the container indoors on a seed warming mat or your warmest, well lit location.
 |
| Clear plastic produce bag ripped open for use as cover. |
Remove the plastic to moisten the surface regularly. Replace plastic cover. Cineraria seeds take up to three weeks to germinate.

Once the seedlings are an inch or so tall, lift them out of the soil with a spoon or fork. Gently separate the seedlings and plant one seedling per 4" pot using potting soil. Put all of the 4" pots on a tray and let the plants continue to grow indoors. Do not place in direct sunlight. Even these small plants like shade!
When it feels like it has warmed up enough outdoors, place the trays of cineraria (still in their 4" pots) outside in a shady spot like a covered deck or carport. No direct sunlight! They don't mind being somewhat cool during the day and night. It is wise to keep the cineraria plants growing in the 4" pots until you are ready to plant them in the ground mid to end of May. Letting them get somewhat root-bound improves their future growth. Fertilize the cineraria plants once at the beginning of April and again at the beginning of May with a liquid fertilizer. Follow the directions and do not over fertilize.
Plant the individual cineraria plants outside in fertile ground mid to end of May. They need a shady spot. It is best to plant cineraria under protective overhangs or under bushes or trees. We plant many cineraria plants in the shady parts of our covered garden. They don't handle rain very well once they flower. If the flowers are protected, they will be stunning from August through November. Water at ground level rather than spraying the flowers.
The flower color of each plant is always a surprise. There are so many colors!

Below are some close-ups of cineraria we have grown:


 |
| Bouquet of cineraria with dahlia, mint and meadow rue. |
HELIOTROPE
Heliotropium arborescens

This is one of my favorite photos. A dahlia smothered in the tiny blossoms and striking foliage of marine heliotrope.
Although marine heliotrope is listed as a perennial, it has only performed as an annual for me here in Sitka. Whether planted out in the open, semi-protected under an overhang or fully protected in our greenhouse, marine heliotrope has not survived beyond one season for me. But that is okay! It is such a uniquely beautiful plant, I don't mind starting a bunch every year.
They are lovely bordering other plants.
They are lovely in bouquets.
And... bees love them.

Two of the seed companies selling marine heliotrope:

JOHNNY-JUMP-UP
Viola cornuta tricolor

Johnny-jump-ups are a variety of perennial violas growing as an annual in our gardens most years. But, they show up every summer as reliably as little kids at the best playground in town. After the first planting, the mature seeds are scattered around in the fall breezes. A good number of the seeds sprout the next year. And so it goes year after year. At least it has in our gardens.
And I am grateful for it.
Johnny-jump-ups are little and cute. Even the name is cute. They have goofy cartoon-like faces.
The flowers and leaves of this plant are edible. With a mild wintergreen-like flavor, people add them to salads, decorate desserts, make tea...
Triplets!

Looks like Violas named 'Johnny-jump-up' are one and the same as Viola 'Helen Mount'

MARIGOLD
Tagetes erecta

It seems pretty safe to say that big, bright, beautiful marigolds are about as popular as flowers can be!
I grew them outside in our gardens once about 30 years ago. Yes, only once. I am betting that there is no other flower growing in Sitka more inclined to attract slugs. There were more slime lines leading to the marigolds than imaginable!
Picking handfuls of slugs off of the marigold plants was a daily event.
Marigolds might do just fine growing in pots in a greenhouse or up away from the ground.
Best of luck if you decide to grow them!
MORNING GLORIES
Morning glories were a familiar sight in summer during my early years in New England. They grew wild and crazy.
Assuming that all morning glories would need more sunshine and heat than we experience here in Sitka, I decided to grow some indoors in our "sun" room.
MOONFLOWER
Ipomoea alba

The blooms were white and huge.

FLYING SAUCER
Ipomoea purpurea
The next summer, we changed it up and grew the morning glory known as 'flying saucers' in place of the 'moonflowers.'
Indoors in large pots filled with potting soil, we were delighted once again.

Here is a closer look at 'flying saucer'

HEAVENLY BLUE
Ipomoea Heavenly Blue

ROYAL BLUE ENSIGN MORNING GLORY
Convolvulus tricolor

I don't remember where I first saw this morning glory bush.
I do know that I was eager to give it a try in our gardens. I have been growing 'blue ensign' for more that 20 years now.
This low bush adds a beautiful blue border to gardens mid-summer through fall.

It seems best to start seeds indoors anytime in March or April. Most years I start a flat of 'blue ensign' using 4 inch pots with 4 or 5 seeds spaced in each pot. The plants form seed pods that mature well and keep gardeners supplied with plenty of seeds for the next year.If you plant the starts on top of a rock wall, part of the bush will stay upright and part will cascade beautifully down the wall a bit.
Here was one of my seed sources for 'blue ensign'

WILD MORNING GLORY
Calystegia sepium

Several decades have passed since I planted a chunk of wild morning glory in the far, lower corner of our yard.
Jerry Snelling, the Sitka Pioneers' Home gardener extraordinaire had warned me not to do this. He said the plant can be fatally intrusive in a garden.
"Well", I thought, "there is nothing down in that dark corner of the yard. It will be so beautiful filled with that beautiful vine with bright, white flowers."
And so it was for many years.
The past few summers have been warmer than years gone by.
The wild morning glory vine went crazy.
If Jerry had visited our gardens last summer, he would have thought, more likely said, "I told you so."

The vines grew up from the corner, under and around a staircase, up a little hill, over a trellis covered with clematis, around stands of ligularia and delphinium and up into a mountain ash tree. Bad news became even worse when I realized that this plant is not annual. It is perennial!
I worked diligently to untangle and remove the vines before they choked and killed any additional neighboring perennials.
Beautiful but deadly.
NASTURTIUM
Tropaeolum majus

I'm thinking that if Sitka had a FAVORITE FLOWER contest, the winner would be nasturtium. Nasturtiums grow well in cool, damp climates and require little fertilizer. They seem to be growing all healthy and beautiful around every corner. They are particularly beautiful cascading down from window boxes. Check out the window boxes at the PETS CHOICE VETERINARY HOSPITAL. Victoria Vosburg makes magic!
Until a few years ago, I had never grown a nasturtium. I am not really sure why. When a friend told me that she decorates and enriches salads with the edible nasturtium flowers and leaves, I decided to grow some. Nasturtiums have a peppery flavor.
Because of our somewhat short season, I start nasturtiums indoors in April in 4 inch pots... one seed per pot. They are planted outside by the end of May.
The short bushy variety, 'Alaska Mix', makes a nice border.

But, the best variety for our own gardens are the tall, trailing nasturtiums.

When planted at the top of our rock walls, the nasturtiums branch and trail down the walls 10 feet or more.

The yellow, red and orange blooms fit right in with so many other fall colored flowers.
Here are three of the companies supplying Sitka businesses with nasturtium seeds.

NEMESIA
Nemesia strumosa 'Paintbox'

Colorful annual flowers destined for cool climates!
Nemesia is a great addition to gardens in containers, along borders and in massive beds.
It seems best to start nemesia indoors in April sprinkling several seeds in each 4 inch pot. Cover the seeds ever so lightly with soil or sand. Plant outdoors in fertile soil in sunniest locations by June.
Nemesia cheiranthus 'Shooting Stars'

Nemesia strumosa 'Carnival Mix'
'Carnival Mix' catches the eye up close...

a little further away...

and off in the distance...

ROSE MALLOW
LAVATERA TRIMESTRIS 'RUBY REGIS'

Yes! This flower sure does look a lot like Hibiscus. That's because it is in the same Mallow Family as Hibiscus. Lots of people call it Rose Mallow, but I have only known it as Lavatera. The color of 'Ruby Regis' is a show stopper!

Isolated, Lavatera is impossible to ignore.

Lavatera grows well in our climate whether it is under an overhang, or out in the open. Solid or dark backgrounds enhance the color.

Beauty is definitely Lavatera's strong point considering it is not especially fragrant nor is it all that happy in bouquets.
It was so many years ago when I bought seeds for this plant that I do not remember which seed company it was. Once I grew Lavatera, I always harvested plenty of seeds for the next year after letting the seedheads mature and dry on the plant.
It was so many years ago when I bought seeds for this plant that I do not remember which seed company it was. Once I grew Lavatera, I always harvested plenty of seeds for the next year after letting the seedheads mature and dry on the plant.
After doing a search on the internet, I see that Lavatera seeds are available from both Vesey's and Halifax Seeds.
Start seeds anytime in April and plant outside in fertile soil around the end of May. Flowers bloom as early as July... and they keep on blooming well into fall.
Save seeds from your plants to start next season!
Save seeds from your plants to start next season!

STRAWFLOWER
Helichrysum bracteatum

I had not imagined that something named STRAWFLOWERS would be colorful. "Beige and brittle," I thought.
But, compared with the other dead stuff in our gardens in fall, the strawflowers looked bright and alive. The flowers die, but the color lives on!

Since I save the flowers from the mature strawflower plants for bouquets, I have never gotten into the habit of saving the seeds. I usually buy a packet of strawflower seeds and start a flat of 4 inch pots sometime around April.

I use potting or seed starting soil and place 4 or 5 seeds in each 4 inch pot. Place the seeds on the top of the soil and press down lightly, but barely cover the seeds with soil.
Around early June, I separate the individual starts from the 4 inch pots and plant them outdoors at least a foot apart in fertile soil.
As the strawflowers mature in fall, I cut the stems as long as possible, carefully removing the moist leaves. Then the strawflowers are hung upside down to dry in small bunches indoors in our warmest, driest location.

After a month or so of drying, I prepare a large, shallow basket with dry floral foam and moss from our muskegs.
I fill the interior of the basket first with my tallest dried flowers. In this case, stems of silver dollar seed pods.

Then I add whatever else I collected and dried heading out from the center with the tallest stems. A bouquet of dried flowers will stay colorful and attractive indoors for a year or more.

SUNFLOWER
Sunflowers are beautiful in Sitka gardens:


and in bouquets:


This sunflower has heart!

Some sunflower plants are short and some are tall:

And some are very tall:
But, compared with the other dead stuff in our gardens in fall, the strawflowers looked bright and alive. The flowers die, but the color lives on!

Since I save the flowers from the mature strawflower plants for bouquets, I have never gotten into the habit of saving the seeds. I usually buy a packet of strawflower seeds and start a flat of 4 inch pots sometime around April.

I use potting or seed starting soil and place 4 or 5 seeds in each 4 inch pot. Place the seeds on the top of the soil and press down lightly, but barely cover the seeds with soil.
Around early June, I separate the individual starts from the 4 inch pots and plant them outdoors at least a foot apart in fertile soil.
As the strawflowers mature in fall, I cut the stems as long as possible, carefully removing the moist leaves. Then the strawflowers are hung upside down to dry in small bunches indoors in our warmest, driest location.

After a month or so of drying, I prepare a large, shallow basket with dry floral foam and moss from our muskegs.
I fill the interior of the basket first with my tallest dried flowers. In this case, stems of silver dollar seed pods.


SUNFLOWER
Sunflowers are beautiful in Sitka gardens:

and in bouquets:
This sunflower has heart!
Some sunflower plants are short and some are tall:
And some are very tall:

Some sunflower plants are tough! These plants remained standing after being challenged by strong winds and heavy rains. Whew!
Bad hair day!

Besides providing color and beauty in the garden, sunflower seeds are a delicious treat for birds and humans.

With a little effort, you can grow a lot of flower!!!
Start by selecting and purchasing seeds for the sunflower varieties you would like to grow. You will discover that there sure are a lot of sunflower varieties from which to choose.
If you are most interested in growing sunflowers for eating, tall plants that grow striped seeds are recommended.
We enjoyed eating the seeds from:
MAMMOTH RUSSIAN
GIGANTEUS
MAMMOTH GRAY STRIPE
KONG
SUNZILLA
TITAN
Once you have made your selection, fill 4 inch pots with potting soil. Place two seeds in each pot about 1/2 inch below the surface. Cover the seeds with more soil. Be sure to label the pots if you are growing more that one variety. I like to write the height on the label with the variety name. It simplifies things later when planting the tall varieties behind the shorter varieties in the garden.

Place the 4 inch pots in a container or tray and sit it on top of a seed warming mat, or your warmest location, indoors. Water the pots gently and thoroughly with room temperature water.
Cover the entire tray with plastic.

Sunflower seeds usually germinate in five days or less.

Once the seeds have sprouted, remove the plastic cover permanently. No more need for the seed warming mat either. Place the tray of sunflower starts in your sunniest, warmest spot indoors. Water regularly. After about three or four weeks, transplant each plant into a larger, gallon-size container. Once transplanted, it is time for the sunflower plants to go out to a cold frame or greenhouse.
 |
| Sunflowers in gallon pots growing in the greenhouse middle right. |
A few weeks later, around June 1st, plant your sunflowers outside in fertile soil in your sunniest location. If you have a location somewhat protected from harsh weather, that would be good. Under an overhang is good, too. Don't forget to water regularly if under an overhang. If you are growing tall varieties, stake the plants when they grow up past a few feet.

Some of the sunflower varieties we have grown:
AMERICAN GIANT
AZTEC GOLD
GIANT SUNGOLD
GOLDEN CHEER
HUMONGOUS
JOKER
KONG
MAMMOTH
MOONSHADOW
PRO CUT GOLD
RED SUN
RING OF FIRE
SORAYA
SKYSCRAPER
SUNRICH LEMON
SUNSEED
SUNZILLA
TAIYO
TEDDY BEAR
TITAN
ZEBULON

SWEET PEA
Lathyrus odoratus

It was my husband who first suggested that we grow SWEET PEAS.
Really? I had never heard of SWEET PEAS myself other than in a song... and was surprised that he knew the name of any flowers at all. Not really his thing.
My husband explained that he thought SWEET PEAS were the flowers that his mother liked to grow in her gardens in southern Washington when he was a kid. My husband has never had anything but kind, loving words to say about his mother.
Yes. I will grow SWEET PEAS.
If you have never grown SWEET PEAS, I encourage you to do so.
It is a tough plant with beautiful, delicate flowers. Most varieties have incomparable fragrance. Thus the word SWEET. So very, very SWEET. Gotta have you in my garden every year SWEET.
There is nothing quite like a big bouquet of SWEET PEA.
Incomparable.

The fragrance is so welcome that we take bouquets of SWEET PEA along on extended boat trips if these flowers are in season. They stay fresh and fragrant for many days. Here are SWEET PEA mixed into a bouquet with fragrant roses. Double delight.

Similar to the peas we grow for eating, SWEET PEAS are easy to grow and do well in our climate.
But, take care not to mix them in with your edible peas. SWEET PEAS are not edible. SWEET PEAS are toxic when ingested. Poison.
I like to start my SWEET PEAS indoors in late March or early April.
First, I soak the seeds in a bowl of water overnight.
Next, I fill a flat or two of 4 inch pots with potting or seed starting soil. I bury 2 or 3 seeds under 1/2 inch of soil in each pot.
I let the plants grow indoors in a warm, sunny location until the plant starts are about 3 inches tall.
I separate the starts and plant them in fertile, well drained soil 6 inches apart with a fence or net close by to support the climbing plants. I like to plant them on both sides of the support fence if possible.

Sometimes I plant them underneath trees with low branches or under flowering vines like clematis. The SWEET PEA holds itself up with tendrils.

We have enjoyed SWEET PEAS growing in our gardens and in bouquets for over three decades.
Here are some of the fragrant varieties we have grown:
- ECKFORD'S FINEST
- HEAVENLY GODDESS
- HIGH SCENT
- MAMMOTH CHOICE
- OLD SPICE
- ROYAL FAMILY MIX
- SNOOPEA
- SUMMER LOVE
- SWEET DREAMS
- UNWIN'S BUTTERFLY
Knowing how much we enjoy SWEET PEAS, a thoughtful friend gave us this book as a gift:

When I would put a bouquet of SWEET PEAS in my children's bedrooms, I told them that the fragrance of SWEET PEAS ensured sweet dreams. How could it not?

This comment has been removed by a blog administrator.
ReplyDelete